
Spring Security -- 2) UserDetailsService
In this post, I am going to use real database to check the user against the request(s). Github Link If you only need to see the code, here is the …
In this post, let’s look at the what UserDetailsManager is, differences between UserDetailsService. And also I am going to implement a project that uses JdbcUserDetailsManager with different passwordEncoder.
Before diving into the detail, you may refer to the previous blog: Security with UserDetailsService
If you only need to see the code, here is the github link
Default project includes the following dependencies: (Yo do not need to use dependency spring-boot-starter-data-jpa )
<dependencies>
		<dependency>
			<groupId>org.springframework.boot</groupId>
			<artifactId>spring-boot-starter-jdbc</artifactId>
		</dependency>
		<dependency>
			<groupId>org.springframework.boot</groupId>
			<artifactId>spring-boot-starter-security</artifactId>
		</dependency>
		<dependency>
			<groupId>org.springframework.boot</groupId>
			<artifactId>spring-boot-starter-web</artifactId>
		</dependency>

		<dependency>
			<groupId>org.postgresql</groupId>
			<artifactId>postgresql</artifactId>
			<scope>runtime</scope>
		</dependency>
		<dependency>
			<groupId>org.springframework.boot</groupId>
			<artifactId>spring-boot-starter-test</artifactId>
			<scope>test</scope>
		</dependency>
		<dependency>
			<groupId>org.springframework.security</groupId>
			<artifactId>spring-security-test</artifactId>
			<scope>test</scope>
		</dependency>
	</dependencies>
I have one controller:
@RestController
public class HelloController {

    @GetMapping("/hello")
    public String hello(){
        return "hello";
    }
}
You do not need to update application.properties file for database connection. In that example, You are going to connect your database via programmatic way (using DataSource object)
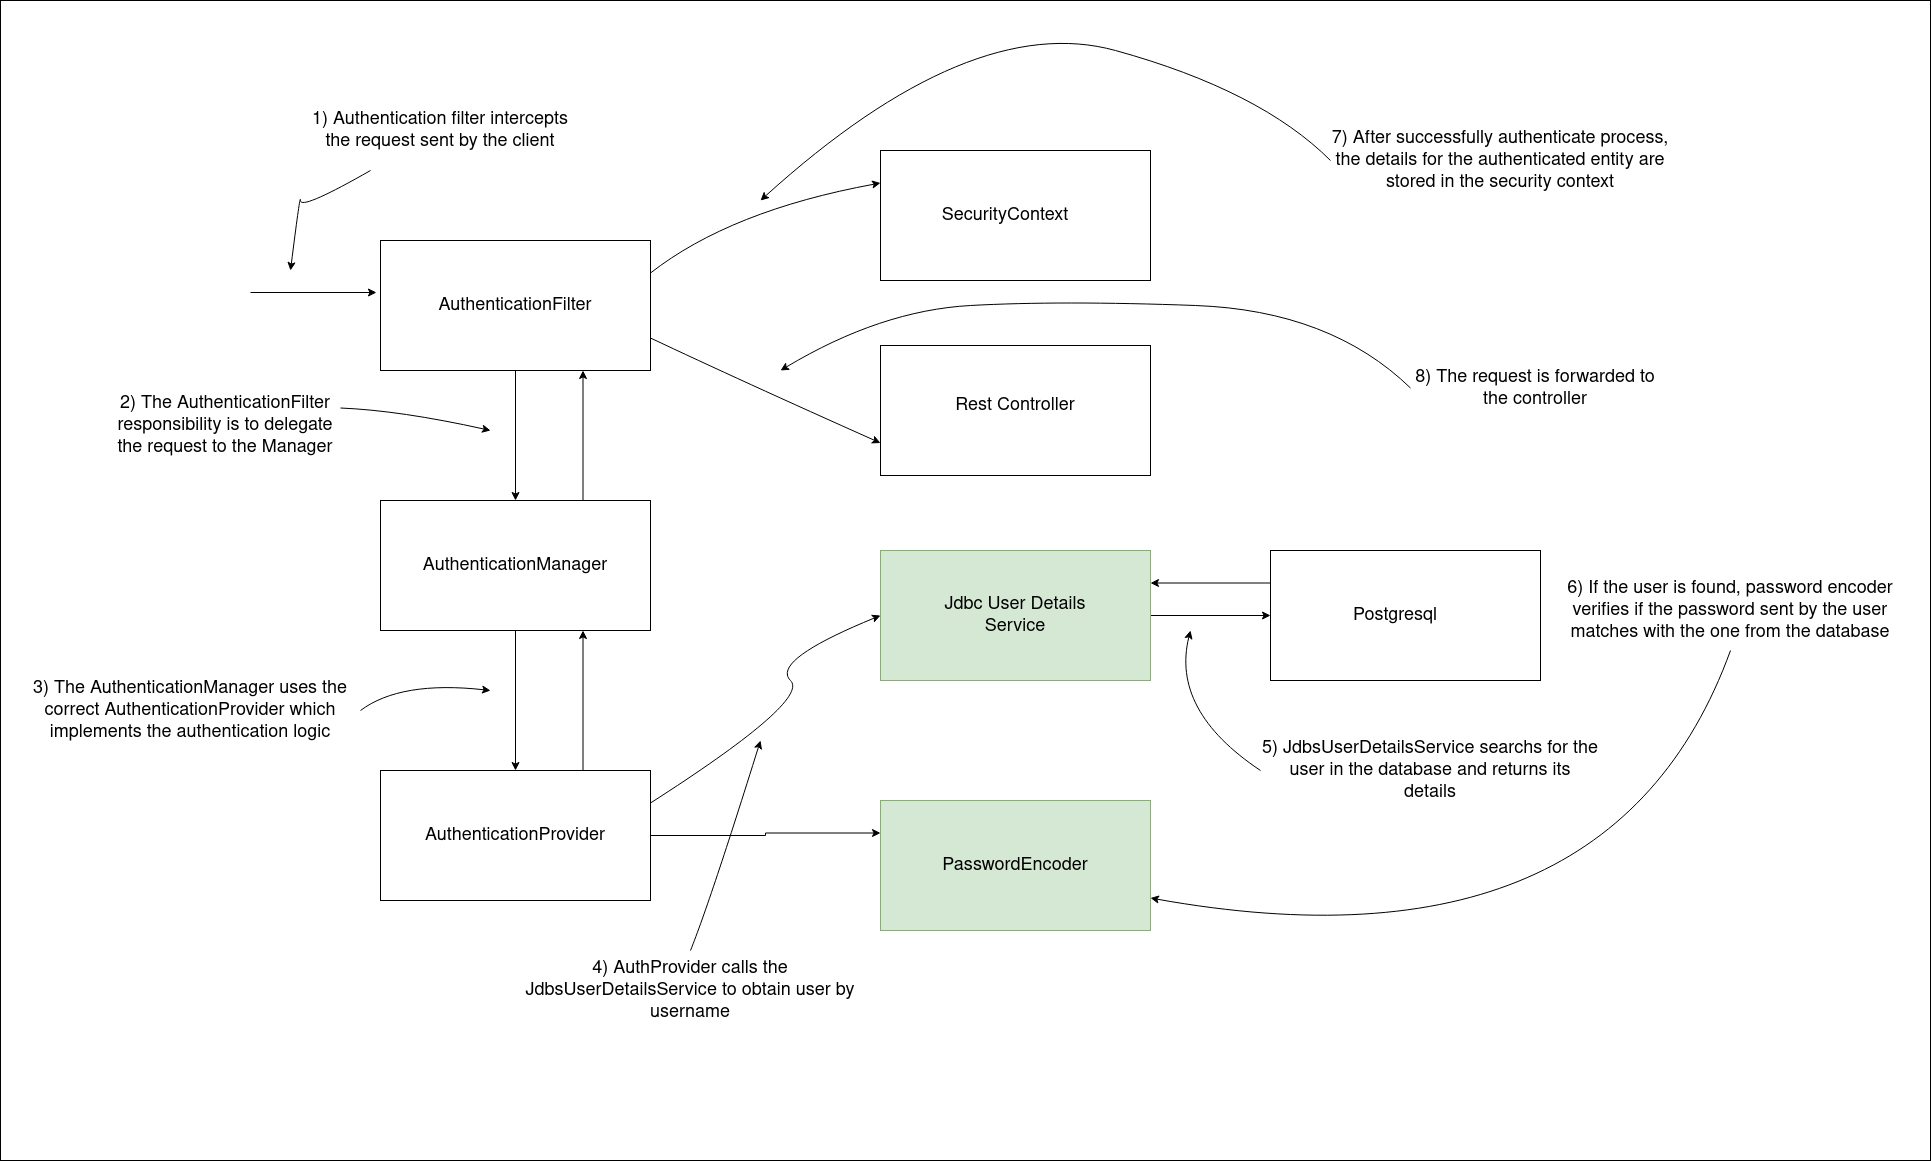
In default, Spring only needs to find out the user’s details by using username, Spring does not need to do some operation on the user. However some applications needs more operational stuff, such as changing password, update the existing user etc.. In that case you should use a UserDetailsManager which extends UserDetailsService
public interface UserDetailsManager extends UserDetailsService {
	void createUser(UserDetails user);
	void updateUser(UserDetails user);
	void deleteUser(String username);
	void changePassword(String oldPassword, String newPassword);
	boolean userExists(String username);
}
As you recall from previous blog, I have used InMemoryUserDetailsManager to create user on the fly. InMemoryUserDetailsManager was actually an UserDetailsManager which states that it is also UserDetailsService. I used InMemoryUserDetailsManager to create a user(or dummy user)
public class InMemoryUserDetailsManager implements UserDetailsManager, UserDetailsPasswordService {
    // ...
}
In this example, I am going to use JdbcUserDetailsManager, and as you can guess, it is used to create, read, delete or update the user based on the table structure.
public class JdbcUserDetailsManager extends JdbcDaoImpl implements UserDetailsManager, GroupManager {
	// ~ Static fields/initializers
	// =====================================================================================

	// UserDetailsManager SQL
	public static final String DEF_CREATE_USER_SQL = "insert into users (username, password, enabled) values (?,?,?)";
	public static final String DEF_DELETE_USER_SQL = "delete from users where username = ?";
	public static final String DEF_UPDATE_USER_SQL = "update users set password = ?, enabled = ? where username = ?";
    public static final String DEF_DELETE_USER_AUTHORITIES_SQL = "delete from authorities where username = ?";
    // ....
}
Take a careful look at this class, this class says that:
“Hey developer, you should have a table called users which has 3 columns–username,password,enabled–(to create, delete or update the users) and table called authorities which has 2 columns–username,authority–(to store authority for the user), because that’s my the default behavior. If you want to change table’s name, in somehow you should override it!!”
To create your own JdbcUserDetailsManager you should give your DataSource to the JdbcUserDetailsManager and JdbcUserDetailsManager will try to connect your database with that source.
Here is the configuration:
package com.mehmetozanguven.springsecuritywithuserdetailsmanager.config;

import org.springframework.context.annotation.Bean;
import org.springframework.context.annotation.Configuration;
import org.springframework.jdbc.datasource.DriverManagerDataSource;
import org.springframework.security.core.userdetails.UserDetailsService;
import org.springframework.security.crypto.password.NoOpPasswordEncoder;
import org.springframework.security.crypto.password.PasswordEncoder;
import org.springframework.security.provisioning.JdbcUserDetailsManager;

import javax.sql.DataSource;

@Configuration
public class ProjectBeanConfiguration {

    @Bean
    public UserDetailsService userDetailsService(){
        return new JdbcUserDetailsManager(dataSource());
    }

    @Bean
    public PasswordEncoder passwordEncoder(){
        return NoOpPasswordEncoder.getInstance();
    }

    @Bean
    public DataSource dataSource(){
        DriverManagerDataSource dataSource = new DriverManagerDataSource();
        dataSource.setUrl("jdbc:postgresql://localhost:5432/testdatabase");
        dataSource.setUsername("postgres");
        dataSource.setPassword("1234");
        return dataSource;
    }
}
Now I should create the correct tables (table’s names that spring knows as default):
I have used the TEXT type for the password column, because in that example, I am going to hash the password and hashed password may not be fit into the column which has varchar type.
For enabled column, do not care about it
[mehmetozanguven@localhost ~]$ sudo -iu postgres
[postgres@localhost ~]$ psql
psql (12.5)
Type "help" for help.

postgres=# \c testdatabase
You are now connected to database "testdatabase" as user "postgres".
testdatabase=# CREATE TABLE IF NOT EXISTS users (username VARCHAR(50) PRIMARY KEY, password TEXT, enabled VARCHAR(50));
CREATE TABLE
testdatabase=# CREATE TABLE authorities (id serial PRIMARY KEY, username VARCHAR(50), authority VARCHAR(50));
CREATE TABLE
testdatabase=# insert into users (username, password, enabled) VALUES ('dummy_user', '123456', 'true');
INSERT 0 1
testdatabase=# insert into authorities (username, authority) VALUES ('dummy_user', 'read');
INSERT 0 1
testdatabase=# insert into authorities (username, authority) VALUES ('dummy_user', 'write');
INSERT 0 1
After dummy user is ready, run the project and the following curl command:
[mehmetozanguven@localhost ~]$ curl --user dummy_user:123456 -X GET http://localhost:8080/hello

hello
As you can see, now I can access the protected endpoint.
Let’s now change the passwordEncoder to the BCryptPasswordEncoder .
Be careful when you are changing the password encoder, some of the encoders are not considered as secure, Spring will annotate these encoders as deprecated.
package org.springframework.security.crypto.bcrypt;

/**
 * Implementation of PasswordEncoder that uses the BCrypt strong hashing function
 */
public class BCryptPasswordEncoder implements PasswordEncoder {
    // ...
}
Just update the configuration:
@Configuration
public class ProjectBeanConfiguration {
	// ...

    @Bean
    public PasswordEncoder passwordEncoder(){
        return new BCryptPasswordEncoder();
    }
    // ...
}
After running the project and the same curl command, you won’t access the protected point because it is not stored as hashed. Just delete rows inside the database:
[mehmetozanguven@localhost ~]$ sudo -iu postgres
[postgres@localhost ~]$ psql
psql (12.5)
Type "help" for help.

postgres=# \c testdatabase
You are now connected to database "testdatabase" as user "postgres".
testdatabase=# TRUNCATE authorities ;
TRUNCATE TABLE
testdatabase=# TRUNCATE users ;
TRUNCATE TABLE
To store user, I just created a simple endpoint called addUser() via POST method.
To use POST method, I disabled the CSRF token protection, (Spring will includes in a default manner). (Just now, we do not care about CSRF). To disable CSRF token, I updated the configuration and extends the class with WebSecurityConfigurerAdapter to override method configure(HttpSecurity..) .
And also I need to setup such that addUser method should not be protected. Otherwise I can not add any user:
@Configuration
public class ProjectBeanConfiguration extends WebSecurityConfigurerAdapter {

    // ...
    @Override
    protected void configure(HttpSecurity http) throws Exception {
        http.httpBasic();

        http.csrf().disable(); // Disable CSRF token protection

        http.authorizeRequests()
                .mvcMatchers("/user").permitAll() // permits all the requests to the /users path
                .anyRequest().authenticated(); // others path will be protected
    }
}
Finally, here is the new endpoint and corresponding new classes:
@RestController
public class HelloController {

   @Autowired
   private JdbcUserDetailsManager userDetailsManager;
	// ...

   @PostMapping("/user")
   public void addUser(@RequestBody UserRequest userRequest){
       userDetailsManager.createUser(new SecureUser(userRequest));
   }
}
public class UserRequest {
    private String username;
    private String password;

    public UserRequest() {
    }

    // ...
}
public class SecureUser implements UserDetails {

    private final UserRequest userRequest;

    public SecureUser(UserRequest userRequest) {
        this.userRequest = userRequest;
    }
    // ...
}
After starting the project, run the following curl command (or do a post request with json format in POSTMAN):
[mehmetozanguven@localhost ~]$ curl -X POST -H "Content-Type: application/json" -d '{"username":"dummy_user", "password":"1234"}' http://localhost:8080/user
Take a look at the databases right now:
testdatabase=# select * from authorities ;
 id |  username  | authority
----+------------+-----------
  4 | dummy_user | read
(1 row)

testdatabase=# select * from users ;
  username  | password | enabled
------------+----------+---------
 dummy_user | 1234     | true
(1 row)
However password is not hashed yet. Let’s add this feature also:
@RestController
public class HelloController {

    @Autowired
    private JdbcUserDetailsManager userDetailsManager;

    @Autowired
    private PasswordEncoder passwordEncoder;

    // ...

    @PostMapping("/user")
    public void addUser(@RequestBody UserRequest userRequest){
        // Method where I hash the password from the request
        // NOTE: doing the hash operation in controller may not be the correct place
        // Implementing the hash operation in any service would be better
        userRequest.setPassword(passwordEncoder.encode(userRequest.getPassword()));
        userDetailsManager.createUser(new SecureUser(userRequest));
    }
}
After starting the project, run the following curl command:
[mehmetozanguven@localhost ~]$ curl -X POST -H "Content-Type: application/json" -d '{"username":"new_dummy_user", "password":"1234"}' http://localhost:8080/user
Databases right now:
testdatabase=# select * from users ;
    username    |                           password                           | enabled
----------------+--------------------------------------------------------------+---------
 dummy_user     | 1234                                                         | true
 new_dummy_user | $2a$10$0Y81dEUg4.aAfjxLkXJvO.3dOy0D9IHS1/bUvPm9mCtv25bdVFlwG | true

testdatabase=# select * from authorities ;
 id |    username    | authority
----+----------------+-----------
  5 | dummy_user     | read
  6 | new_dummy_user | read
Finally I hashed the password, right now I can access the protected endpoint using the new_dummy_user:
[mehmetozanguven@localhost ~]$ curl --user new_dummy_user:1234 -X GET http://localhost:8080/hello
hello
I will continue with the next one …
In this post, I am going to use real database to check the user against the request(s). Github Link If you only need to see the code, here is the …
In these short series , I am going to dive into what Spring Security is, how Spring Security works. Most of the example application would be for web …