Spring Security -- 7) Security Context and Security Context Holder
In this post, let’s find out what the Security Context is I am going to use the project that I have implemented in the previous post. Here is …
In this post, we are going to learn what CSRF(or XSRF) attack is, how to simulate csrf attack in spring and how to setup csrf protection in spring application
If you only need to see the code, here is the github link
Three conditions must match:
Let’s say there is post request to change email address of user, like this one:
POST /email/change HTTP/1.1
Host: sample.com
Content-Type: application/x-www-form-urlencoded
Content-Length: 30
Cookie: session=abcsdf123dacxvç
[email protected]
// This request is suitable for CSRF attacks, because action is simple and modifying
permission, session cookie is used to recognize user, and there is no unpredictable
post parameter
<html>
  <body>
    <form action="https://sample.com/email/change" method="POST">
      <input type="hidden" name="email" value="[email protected]" />
    </form>
    <script>
      document.forms[0].submit();
    </script>
  </body>
</html>
Cookies are small pieces of text passed back and forth between the browser and web server in HTTP headers. If the web server returns an HTTP response containing a header value like Set-Cookie: _xsrf=5978e29d4ef434a1 , the browser will send back the same information in the next HTTP request in a header with form Cookie: _xsrf=5978e29d4ef434a1
Set-Cookie: _xsrf=5978e29d4ef434a1; SameSite=Strict;
To simulate CSRF attacks, first create a simple spring boot project. This project will contain the following dependencies:
And create home controller which returns the homePage.html:
@Controller
public class HomeController {

    @GetMapping
    public String homePage() {
        return "homePage";
    }
}
Create homePage.html inside the resources/templates folder:
<!DOCTYPE html>
<html lang="en">
  <head>
    <meta charset="UTF-8" />
    <title>Title</title>
  </head>
  <body>
    <p>HomePage</p>
  </body>
</html>
Run the project, and try to connect localhost:8080 , you will be redirected to the login page, username will be user and password can be found in the console:
// ...
Using generated security password: fa146166-c0ce-4e85-add0-e8dc48daaf00
// ...
After successful login, you will see the homePage.
To logout just go to the http://localhost:8080/logout
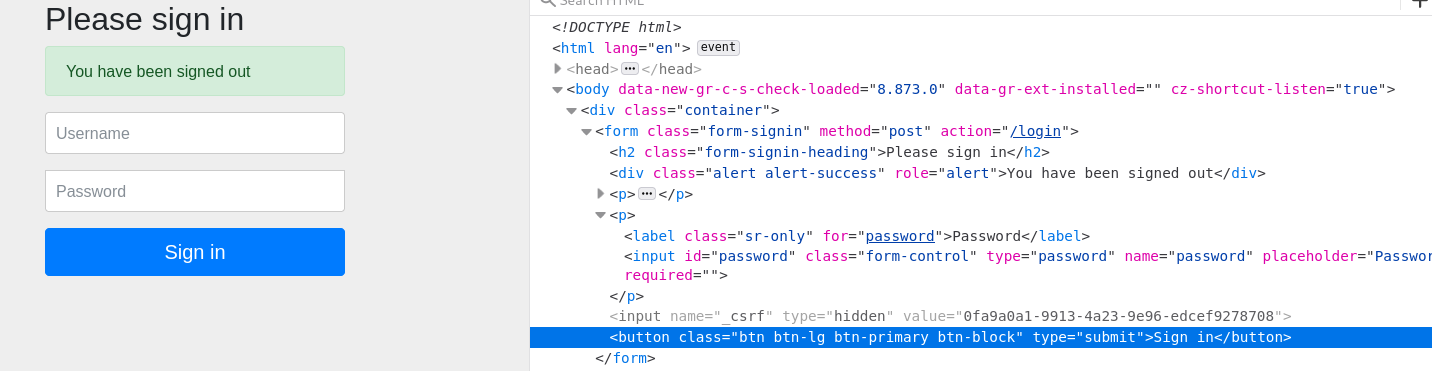
Spring Security will enable the CSRF token by default, if you want to see where csrf token is, after logout inspect the login form and you will see the hidden variable called _csrf :
First create a post endpoint (just assume that this post endpoint is responsible to change user’s password):
@Controller
public class PasswordController {
    private final CustomerPasswordService customerPasswordService;

    public PasswordController(@Autowired CustomerPasswordService customerPasswordService) {
        this.customerPasswordService = customerPasswordService;
    }

    @PostMapping("/changePassword")
    public String changeCustomerPassword(@RequestParam String newPassword) {
        System.out.println("New Password will be: " + newPassword);
        customerPasswordService.changePassword(newPassword);
        model.addAttribute("newPassword", newPassword);
        return "passwordChanged";
    }
}
CustomerPasswordService is just a dummy service:
@Service
public class CustomerPasswordService {

    public void changePassword(String newPassword) {
        // dummy method
        System.out.println("Customer password was changed to: " + newPassword);
    }
}
Update the homePage.html (just add the form )
<!DOCTYPE html>
<html lang="en">
  <head>
    <meta charset="UTF-8" />
    <title>Title</title>
  </head>
  <body>
    <p>HomePage</p>
    <form method="post" action="/changePassword">
      <p>Write your new password:</p>
      <input type="password" name="newPassword" />
      <button type="submit">Change My Password</button>
    </form>
  </body>
</html>
Create the passwordChanged.html :
<!DOCTYPE html>
<html lang="en">
  <head>
    <meta charset="UTF-8" />
    <title>Title</title>
  </head>
  <body>
    <h2>
      Your password was changed. New Password is :
      <span th:text="${newPassword}"></span>
    </h2>
  </body>
</html>
Run the application and press the button, you will be redirected to the passwordChanged.html and you will see your new password also in the console you will see the following outputs:
New Password will be: asd
Customer password was changed to: asd
To disable CSRF protection, just override configuration configure(HttpSecurity http)
Disabling the CSRF protection is not recommended
@Configuration
public class SecurityConfiguration extends WebSecurityConfigurerAdapter  {
    @Override
    protected void configure(HttpSecurity http) throws Exception {
        super.configure(http);
        http.csrf().disable();
    }
}
Make sure that you disabled the CSRF protection
The best way to understand why CSRF protection is needed is to generate attack and to see what’s happening in the background.
Create an simple html file called attacker.html
Let’s assume that I am a influencer and somebody wants to connect me :) (because I have done awesome jobs/works etc.. according to the attacker :) )
<!DOCTYPE html>
<html lang="en">
  <head>
    <meta charset="UTF-8" />
    <title>Fake Email from attacker</title>
  </head>
  <body>
    <h1>Can I get your feedback on career advice?</h1>
    <form method="post" action="http://localhost:8080/changePassword">
      <p>
        Hey Mehmet Ozan Guven, I hope you're doing well! I'm reaching out
        because I'm thinking of making a career change and would love to get
        your advice. I admire you and all you've accomplished. I would be eager
        to have your input. Free for coffee sometime this week?
      </p>
      <input type="hidden" name="newPassword" value="attackNewPassword" />
      <button type="submit">See Contact Information</button>
    </form>
  </body>
</html>
Please look at the action, it is the our changePassword endpoint (which of course full url) and also attacker will try to set the legitimate customer’s password something else.
ow, when you are logged-in the application, please open the attacker.html page in the browser chrome/firefox etc.. then click the button See Contact Information
After clicking the button, you will be redirected to the page http://localhost:8080/changePassword with this output:
Your password was changed. New Password: attackNewPassword
You can verify that in the console as well:
New Password will be: attackNewPassword
Customer password was changed to: attackNewPassword
That’s the CSRF attack, attacker triggers the user to perform an action on behalf of the user
Now, let’s see how spring security protect our customer(s).
Enable the csrf protection via comment out this line:
@Configuration
public class SecurityConfiguration extends WebSecurityConfigurerAdapter  {

    @Override
    protected void configure(HttpSecurity http) throws Exception {
        super.configure(http);
//        http.csrf().disable(); // not recommended
    }
}
and re-run the project:
When we enable csrf protection:
After successful login, try to change your password in the homePage. You will get the Whitelabel Error Page response, after submitting the form:
Whitelabel Error Page This application has no explicit mapping for /error, so
you are seeing this as a fallback. Wed May 12 16:57:38 TRT 2021 There was an
unexpected error (type=Forbidden, status=403).
You can also verify that in the console (There will be no outputs)
How Did I Pass the Login Form?
You may ask “if I can not pass the password change form, how did i pass the login form?” answer is: Spring will automatically add the csrf token in the request (take look at the picture in the section Where is the CSRF token ?)
Let’s protect the password form.
With thymeleaf engine, it is easy: (update the homePage.html)
<!DOCTYPE html>
<html lang="en">
  <html xmlns:th="https://www.thymeleaf.org">
    <head>
      <meta charset="UTF-8" />
      <title>Title</title>
    </head>
    <body>
      <p>HomePage</p>
      <form method="post" action="/changePassword">
        <p>Write your new password:</p>
        <input type="password" name="newPassword" />
        <input
          type="hidden"
          th:name="${_csrf.parameterName}"
          th:value="${_csrf.token}"
        />
        <button type="submit">Change My Password</button>
      </form>
    </body>
  </html>
</html>
Run the project. In the password form, inspect the elements:
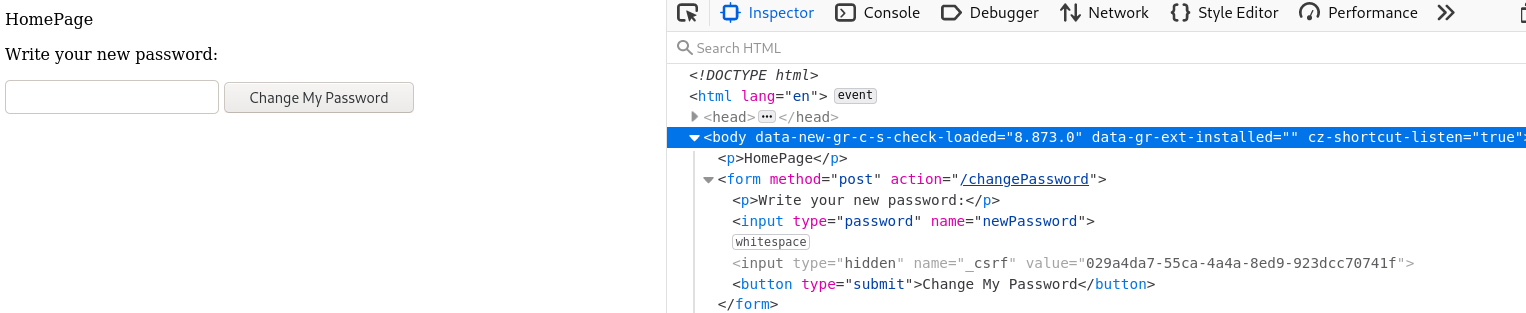
Now, we have the csrf token, customer can change his/her password
Now, try to change customer password with attacker email
Just run the attack email in browser (when you are logged-in) and click the link. You will get the Whitelabel error page, because there is not csrf token then Spring security will reject the request.
HttpSessionCsrfTokenRepository, you will see this method:private String createNewToken() {
return UUID.randomUUID().toString();
}
By default csrf token stored in the HttpSession and validated by server-side. In spring security HttpSessionCsrfTokenRepository is responsible for that.
Just add the debug point to the CsrfFilter.doFilterInternal(...) method
You can customize with CsrfConfigurer<HttpSecurity>
Here is the example configuration for that, you can use it for your project:
@Configuration
@EnableWebSecurity
public class SecurityConfiguration extends WebSecurityConfigurerAdapter  {

    @Override
    protected void configure(HttpSecurity http) throws Exception {
        super.configure(http);
//        http.csrf().disable(); // not recommended
        http.csrf(c -> {
           c.ignoringAntMatchers("/disabledEndpoint", "/anotherEndpointParent/**");
        });
    }
}
Spring Security will provide an interface called interface CsrfTokenRepository to customize everything related to CSRF.
public interface CsrfTokenRepository {
	CsrfToken generateToken(HttpServletRequest request);
	void saveToken(CsrfToken token, HttpServletRequest request,
			HttpServletResponse response);
	CsrfToken loadToken(HttpServletRequest request);
}
CsrfToken is the another interface to provide information about CSRF token in the spring application:
public interface CsrfToken extends Serializable {
	String getHeaderName();
	String getParameterName();
	String getToken();
}
You can implement your own repository.
Do not customize the csrf repository unless you know what you are doing. Custom implementation can cause security vulnerabilities !!
You can find the example in my github repo , especially: MyCsrfRepository
And update configuration:
@Configuration
@EnableWebSecurity
public class SecurityConfiguration extends WebSecurityConfigurerAdapter  {

    @Override
    protected void configure(HttpSecurity http) throws Exception {
        super.configure(http);
//        http.csrf().disable(); // not recommended
        http.csrf(c -> {
           c.ignoringAntMatchers("/disabledEndpoint", "/anotherEndpointParent/**");
           c.csrfTokenRepository(new MyCsrfRepository());
        });
    }
}
I will continue with the next one
In this post, let’s find out what the Security Context is I am going to use the project that I have implemented in the previous post. Here is …
In this post, let’s implement two steps authentication mechanism. This will be similar to JWT authentication but instead of JWT I will use my …