Spring Boot with OAuth2 - Theory
In this post, we are going to learn what the oAuth2 is, how to use OAuth2 in Spring boot. We will start with why do we need a OAuth2, we will look at …
In this article, we will implement a basic single sign on application using Spring boot. We will use Thymeleaf for html pages
A single sign-on (SSO) application is one in which we authenticate users through an authorization server, and then the app keeps us as logged-in, using a refresh token.
In our application we will use Google as the authorization and resource servers
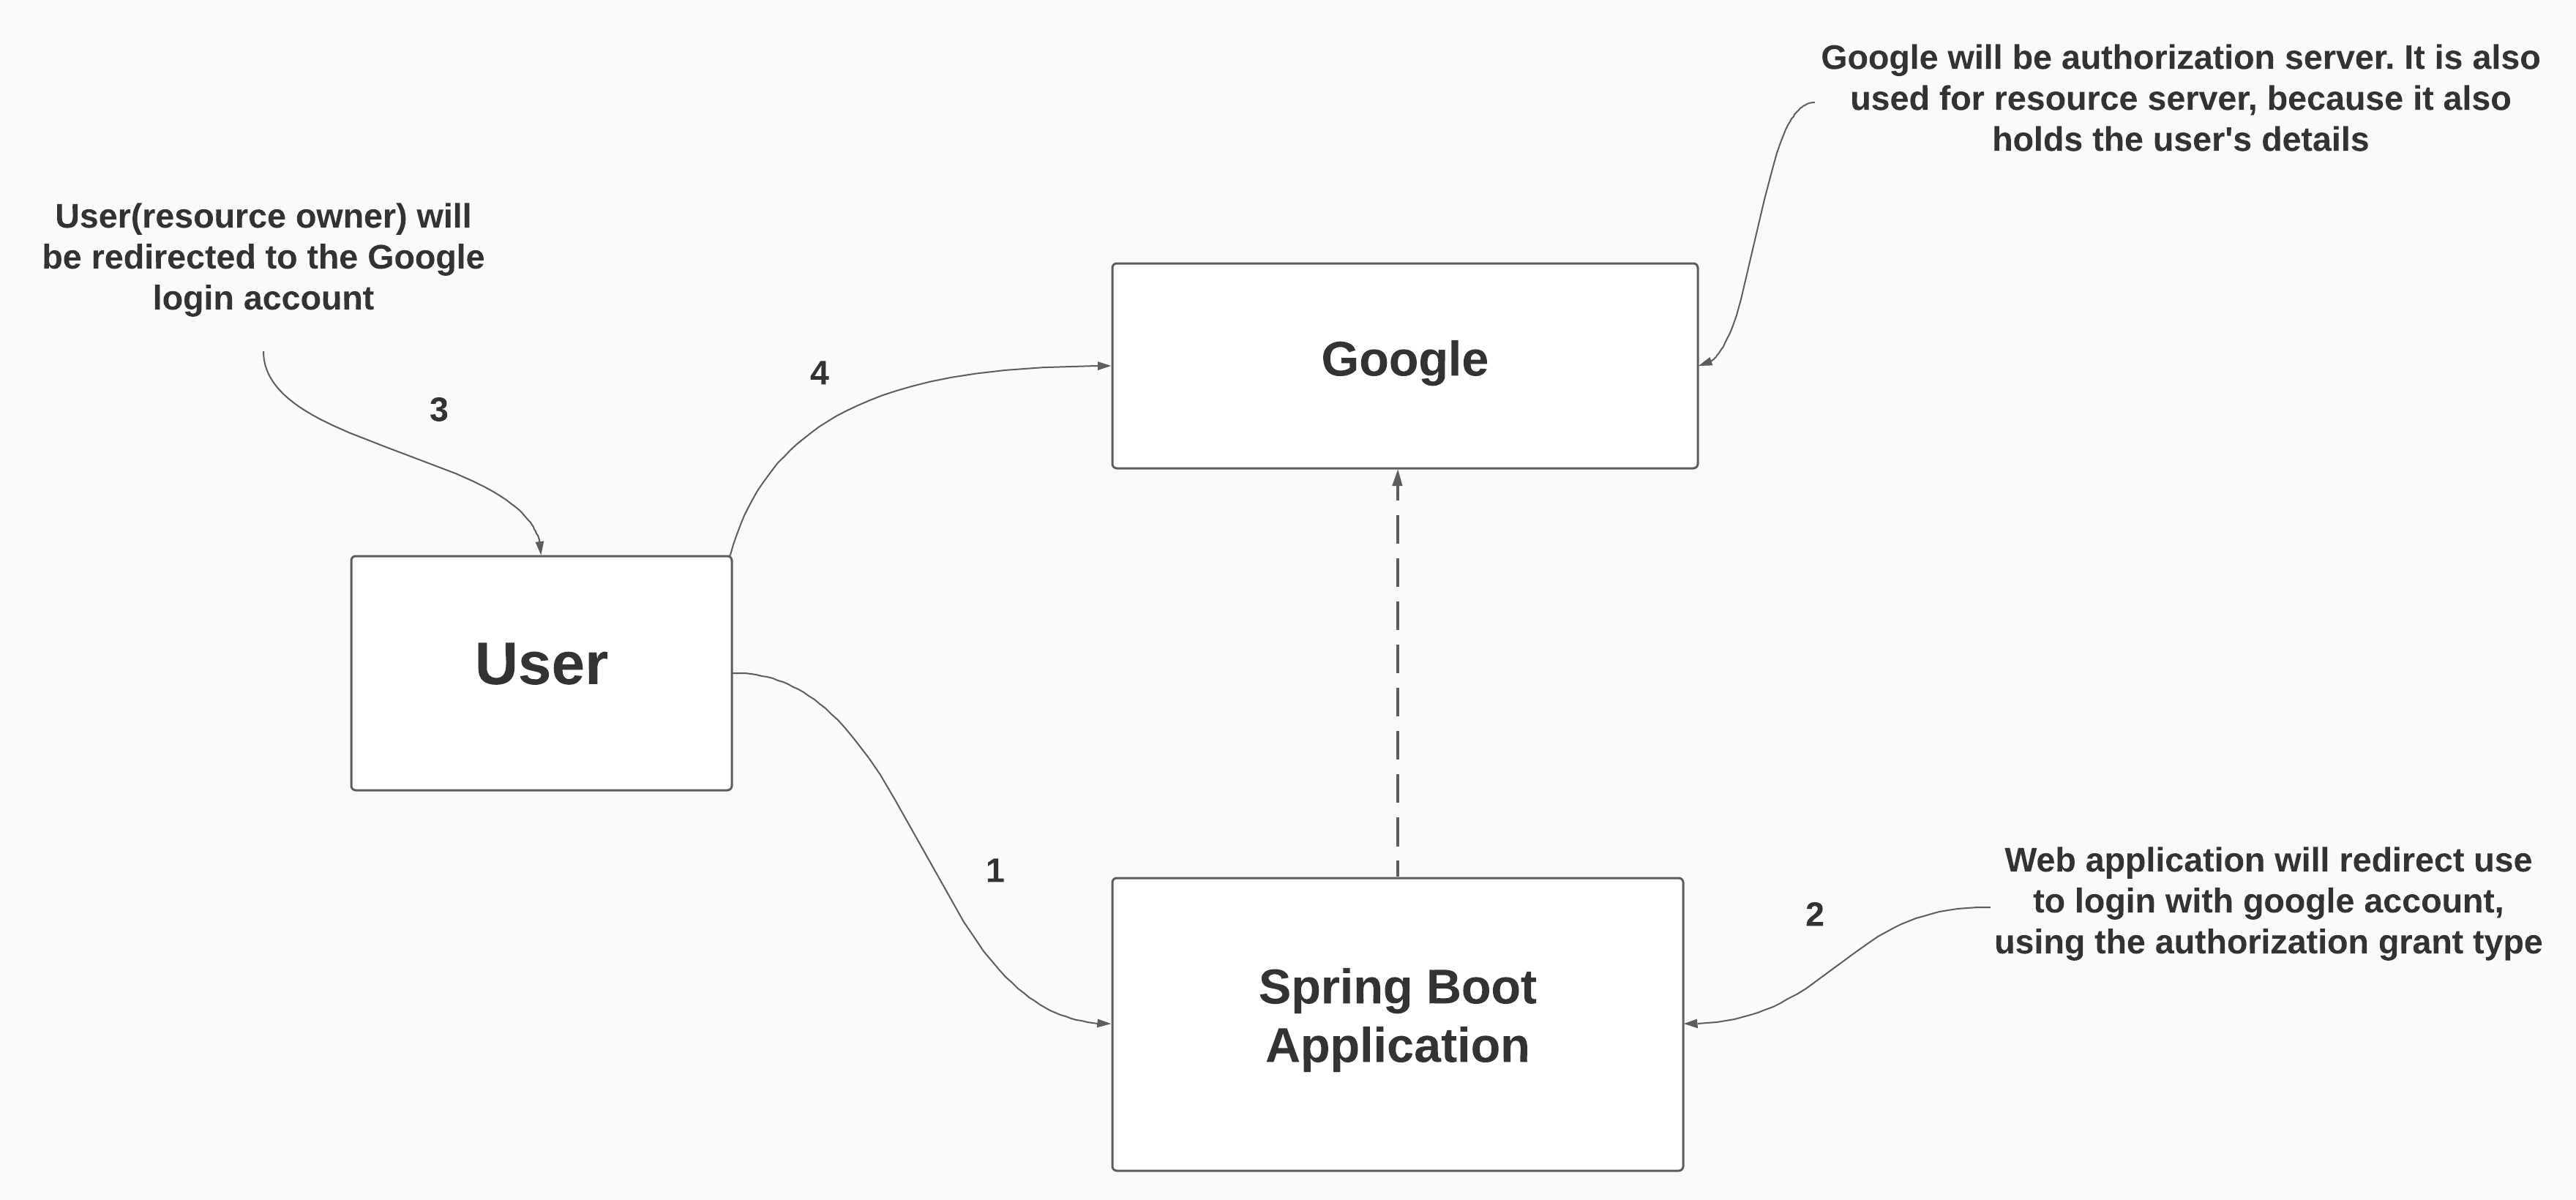
In this diagram:
User = resource owner
Spring Boot Application = The Client
Google = Authorization Server & Resource Server
If you remember the my previous blog, the client will only needs to send client ID and client secret. Then, Google can identify our web application(the client). And also our client won’t manage username & password for users.
I will not go into the details of how to setup your google (via console.cloud.google.com) to use as OAuth. There are tons of tutorial on Internet.
Just make sure that:
- Authorized Javascript origins = http://localhost:8080 (The HTTP origins that host your web application.)
- Authorized redirect URIs = http://localhost:8080/login/oauth2/code/google (Users will be redirected to this path after they have authenticated with Google.)
At the end google will prompt us a message:

Note: Google restricts us to use only test users.
This configuration is everything we need from AuthorizationServer. We can implement the spring boot application.
Create the spring boot application with the following dependencies:
<dependency>
	<groupId>org.springframework.boot</groupId>
	<artifactId>spring-boot-starter-thymeleaf</artifactId>
</dependency>
<dependency>
	<groupId>org.springframework.boot</groupId>
	<artifactId>spring-boot-starter-oauth2-client</artifactId>
</dependency>
<dependency>
	<groupId>org.springframework.boot</groupId>
	<artifactId>spring-boot-starter-security</artifactId>
</dependency>
<dependency>
	<groupId>org.springframework.boot</groupId>
	<artifactId>spring-boot-starter-web</artifactId>
</dependency>
We will return basic html page from the controller:
@Controller
public class DemoController {

    @GetMapping("/")
    public String getHomePage() {
        return "homePage";
    }
}
Also creates homePage.html under the resources -> templates:
<!DOCTYPE html>
<html lang="en">
  <head>
    <meta charset="UTF-8" />
    <title>HomePage</title>
  </head>
  <body>
    <h3>Welcome</h3>
  </body>
</html>
Now, we can write our security configuration extending the class WebSecurityConfigurerAdapter. In this time, we will not use formLogin() we will use something different called oauth2login()
@Configuration
public class SecurityConfiguration extends WebSecurityConfigurerAdapter {

    @Override
    protected void configure(HttpSecurity http) throws Exception {
        http.oauth2Login(); // Set the authentication method

        http.authorizeRequests() // Set the all endpoints will be protected
                .anyRequest()
                .authenticated();
    }
}
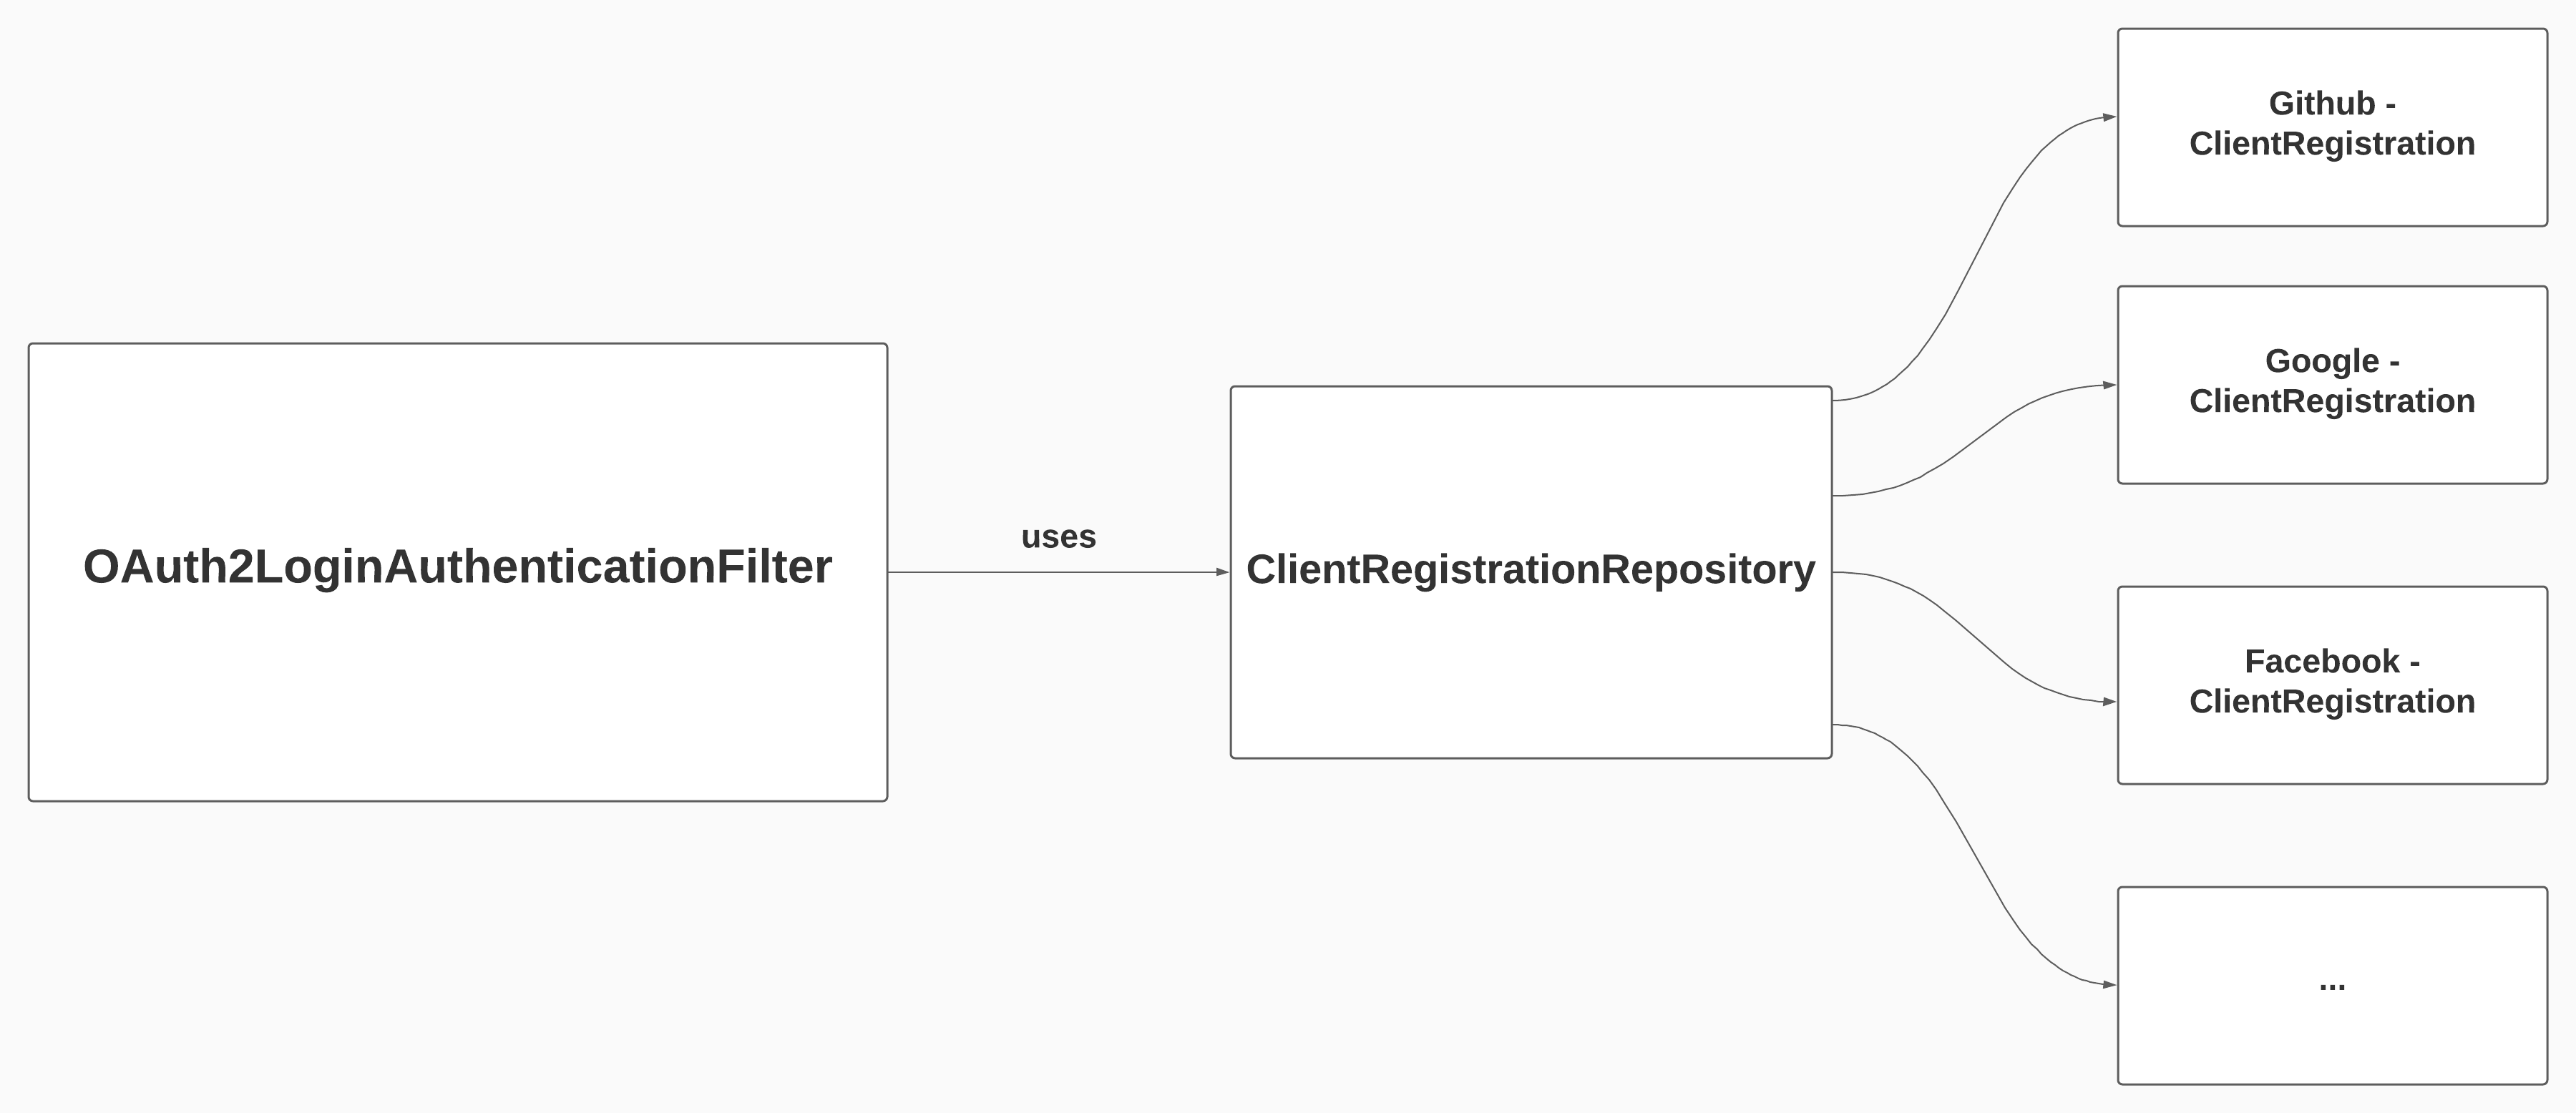
oauth2login() simply adds new authentication filter called OAuth2LoginAuthenticationFilter. (responsible for authentication)oauth2login() also adds another filter called OAuth2AuthorizationRequestRedirectFilter. (responsible for redirection of the endpoint of the authorization server)I have also written about the spring security filter chains and also created custom filter in the spring application. Link => https://mehmetozanguven.github.io/spring/2020/12/30/spring-security-5-custom-filter.html
oauth2Login() , we added the OAuth2LoginAuthenticationFilter which applies the needed logic for OAuth2 authentication
If we start application at this point, application will fail. Because we didn’t specify any Authorization Server. For this we will use ClientRegistration class.
This class represents the client in the OAuth2. For the client, we need to define:
Here is the client registration for google:
private ClientRegistration googleClientRegistration() {
        return ClientRegistration.withRegistrationId("google")
                .clientId("your_client_id")
                .clientSecret("your_client_secret")
                .authorizationGrantType(AuthorizationGrantType.AUTHORIZATION_CODE)
                .redirectUri("{baseUrl}/login/oauth2/code/{registrationId}")
                .scope("openid", "profile", "email")
                .authorizationUri("https://accounts.google.com/o/oauth2/v2/auth")
                .tokenUri("https://www.googleapis.com/oauth2/v4/token")
                .userInfoUri("https://www.googleapis.com/oauth2/v3/userinfo")
                .userNameAttributeName(IdTokenClaimNames.SUB)
                .jwkSetUri("https://www.googleapis.com/oauth2/v3/certs")
                .clientName("Google").build();
    }
These URIs is defined by the Google itself.
But as you can see there are many fields to be filled. To avoid fill all the fields, Spring Security provides an easy way. Spring security provides an ClientRegistration builder for the most common provides:
Then we can use the builder for Google:
 private ClientRegistration googleClientRegistration() {
        return  CommonOAuth2Provider.GOOGLE
                .getBuilder("google")
                .clientId("your_client_id")
                .clientSecret("your_client_secret")
                .build();
    }
Creating clientRegistration is not enough, we should also tell the spring boot application to use it. To do that we will use ClientRegistrationRepository
To setup ClienRegistration, Spring Security uses ClientRegistrationRepository
Actually
ClientRegistrationRepositoryis similar toUserDetailsService. As you recallUserDetailsServicewill try to findUserDetails. We can apply the same logic in here:ClientRegistrationRepositorytries to findClientRegistration
We can use InMemoryClientRegistrationRepository (kind of InMemoryUserDetailsService) and put the google client inside it:
Configuration
public class SecurityConfiguration extends WebSecurityConfigurerAdapter {
    ....
    @Bean
    public ClientRegistrationRepository clientRepository() {
        ClientRegistration google = googleClientRegistration();
        return new InMemoryClientRegistrationRepository(google);
    }

    private ClientRegistration googleClientRegistration() {
        return  CommonOAuth2Provider.GOOGLE
                .getBuilder("google")
                .clientId("CLIENT_ID")
                .clientSecret("CLIENT_SECRET")
                .build();
    }
}
Note: we can also register the (instead of Bean) ClientRegistrationRepository using customized inside http.oauh2Login()
@Configuration
public class SecurityConfiguration extends WebSecurityConfigurerAdapter {
    @Override
    protected void configure(HttpSecurity http) throws Exception {
        http.oauth2Login( custo ->
                         custo.clientRegistrationRepository(clientRepository())
                        ); // Set the authentication method

        http.authorizeRequests() // Set the all endpoints will be protected
                .anyRequest()
                .authenticated();
    }

    public ClientRegistrationRepository clientRepository() {
        ClientRegistration google = googleClientRegistration();
        return new InMemoryClientRegistrationRepository(google);
    }

    private ClientRegistration googleClientRegistration() {
        return  CommonOAuth2Provider.GOOGLE
                .getBuilder("google")
                .clientId(CLIENT_ID)
                .clientSecret(CLIENT_SECRET)
                .build();
    }
}
Spring Boot will also allow us to use properties file to construct ClientRegistration and ClientRegistrationRepository instead of directly creating it. (Probably, you have seen this in many articles !!!)
Just add the following properties in the application.properties files:
spring.security.oauth2.client.registration.google.client-id=your_client_id
spring.security.oauth2.client.registration.google.client-secret=your_secret_key
Because we wrote registration.google, spring will automatically create a google client registration from the CommonOAuth2Provider.GOOGLE
After adding properties: we can remove the ClientRegistrationRepository bean and the method googleClientRegistration() from the configuration.
If you need to load client registration from the database, you may use the Bean solution, otherwise using properties will be more cleaner
As you remember from the previous blog, logged-in user will be stored in the SecurityContext. We will use the SecurityContext to get logged-in user information when we also use oauth2Login()
@Controller
public class DemoController {
    private static final Logger logger = LoggerFactory.getLogger(DemoController.class.getSimpleName());

     @GetMapping("/")
    public String getHomePage() {
        SecurityContext securityContext = SecurityContextHolder.getContext();
        OAuth2AuthenticationToken loggedInUser =(OAuth2AuthenticationToken) securityContext.getAuthentication();
        logger.info("Logged-in user: {}", loggedInUser);
        return "homePage";
    }
}
After you run the project, you will be redirected to the Google login page, write your gmail account and password, after that you will the homePage, and in the console:
INFO 17474 --- [nio-8080-exec-6] DemoController : Logged-in user: OAuth2AuthenticationToken [Principal=Name: [...], Granted Authorities: [[ROLE_USER, SCOPE_https://www.googleapis.com/auth/userinfo.email, SCOPE_https://www.googleapis.com/auth/userinfo.profile, SCOPE_openid]], User Attributes: [{..., name=Mehmet Ozan Güven, [email protected]}], Credentials=[PROTECTED], Authenticated=true, Details=WebAuthenticationDetails [RemoteIpAddress=127.0.0.1, ...], Granted Authorities=[ROLE_USER, SCOPE_https://www.googleapis.com/auth/userinfo.email, SCOPE_https://www.googleapis.com/auth/userinfo.profile, SCOPE_openid]]
In this small spring boot application, we learned how to use OAuth2 with Spring Boot.
http.oauth2Login(), you are actually creating new filter called OAuth2LoginAuthenticationFilter and this filter will run its login in the security filter chains.OAuth2LoginAuthenticationFilter is not enough, you should also create ClientRegistration and ClientRegistrationRepository to work with OAuth2ClientRegistrationRepository holds the ClientRegistration(s)ClientRegistrationRepository & ClientRegistration. For example, If you use common provider like Google, then you need two properties:spring.security.oauth2.client.registration.google.client-id=your_client_id
spring.security.oauth2.client.registration.google.client-secret=your_secret_key
SecurityContextIn this post, we are going to learn what the oAuth2 is, how to use OAuth2 in Spring boot. We will start with why do we need a OAuth2, we will look at …
In this post, we are going to setup spring boot rest project with using JWT. we will also integrate the our spring boot application with the frontend …