
Spring Boot JWT Setup with Frontend (VueJs)
In this post, we are going to setup spring boot rest project with using JWT. we will also integrate the our spring boot application with the frontend …

In this post, we are going to learn what the oAuth2 is, how to use OAuth2 in Spring boot. We will start with why do we need a OAuth2, we will look at the possible implementations of OAuth2 and finally we will talk about possible security issues when using OAuth2.
OAuth 2.0 is the industry-standard protocol for authorization.
OAuth 2.0 focuses on client developer simplicity while providing specific authorization flows for web applications, desktop applications, mobile phones, and living room devices.
Overall OAuth2 primary purpose is to allow a third-party website or app to access to a resource
Quick Notes:
- Authorization is the process of giving the user permission to access a specific resource or function.
- Authentication is the process of validating users whom they claim to be.
There must be a reason to use one tool instead of another. OAuth2 can be useful because:
If you look at the picture below, same client username and password is stored in the three different applications with independently. If you work in the organization, this will be hard to maintain.
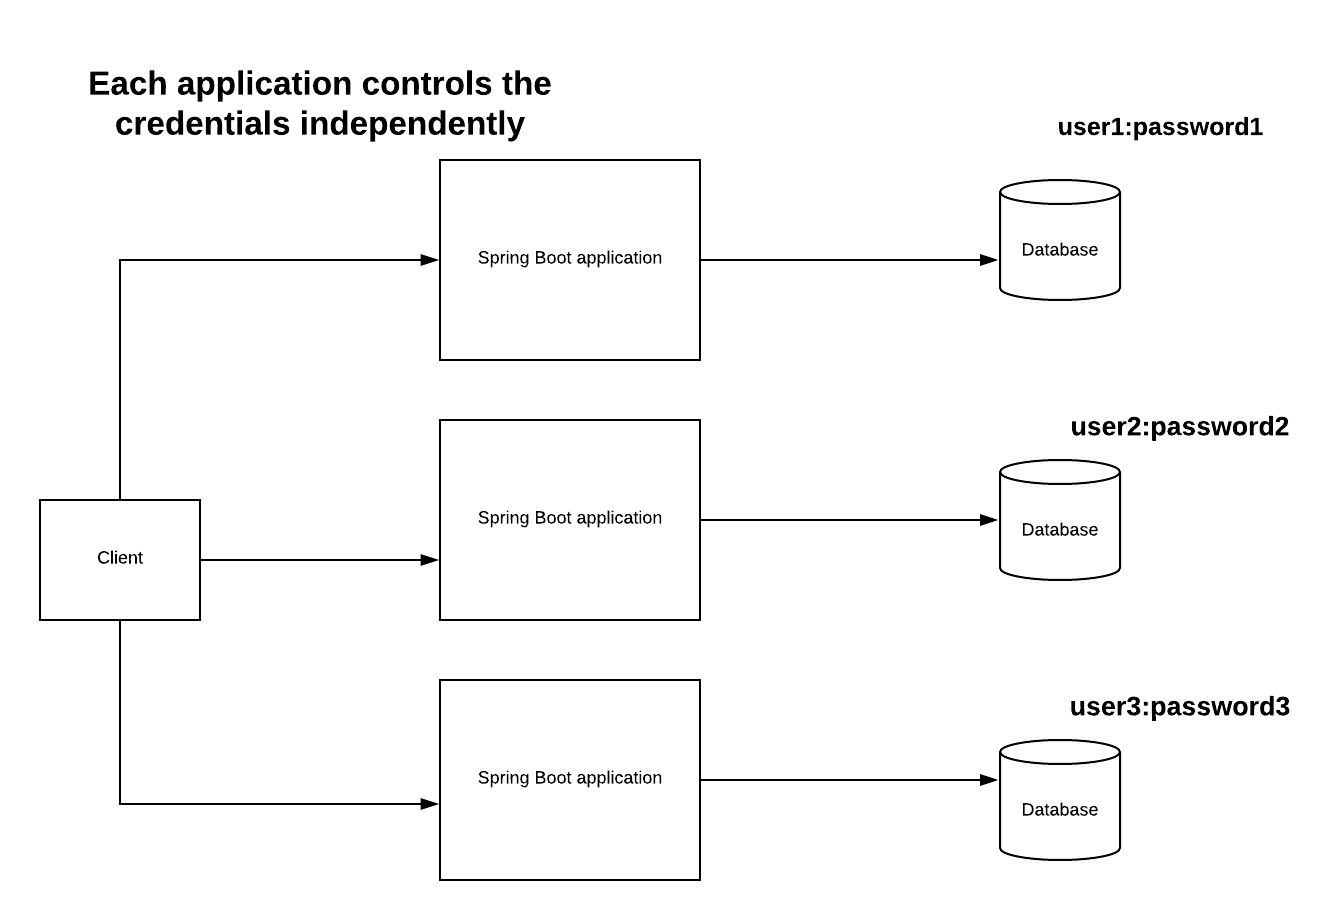
Therefore it would be better if we isolated the responsibility for credential management in one component. We can call this component authorization server:
With this way we eliminate the duplication of user’s credentials.
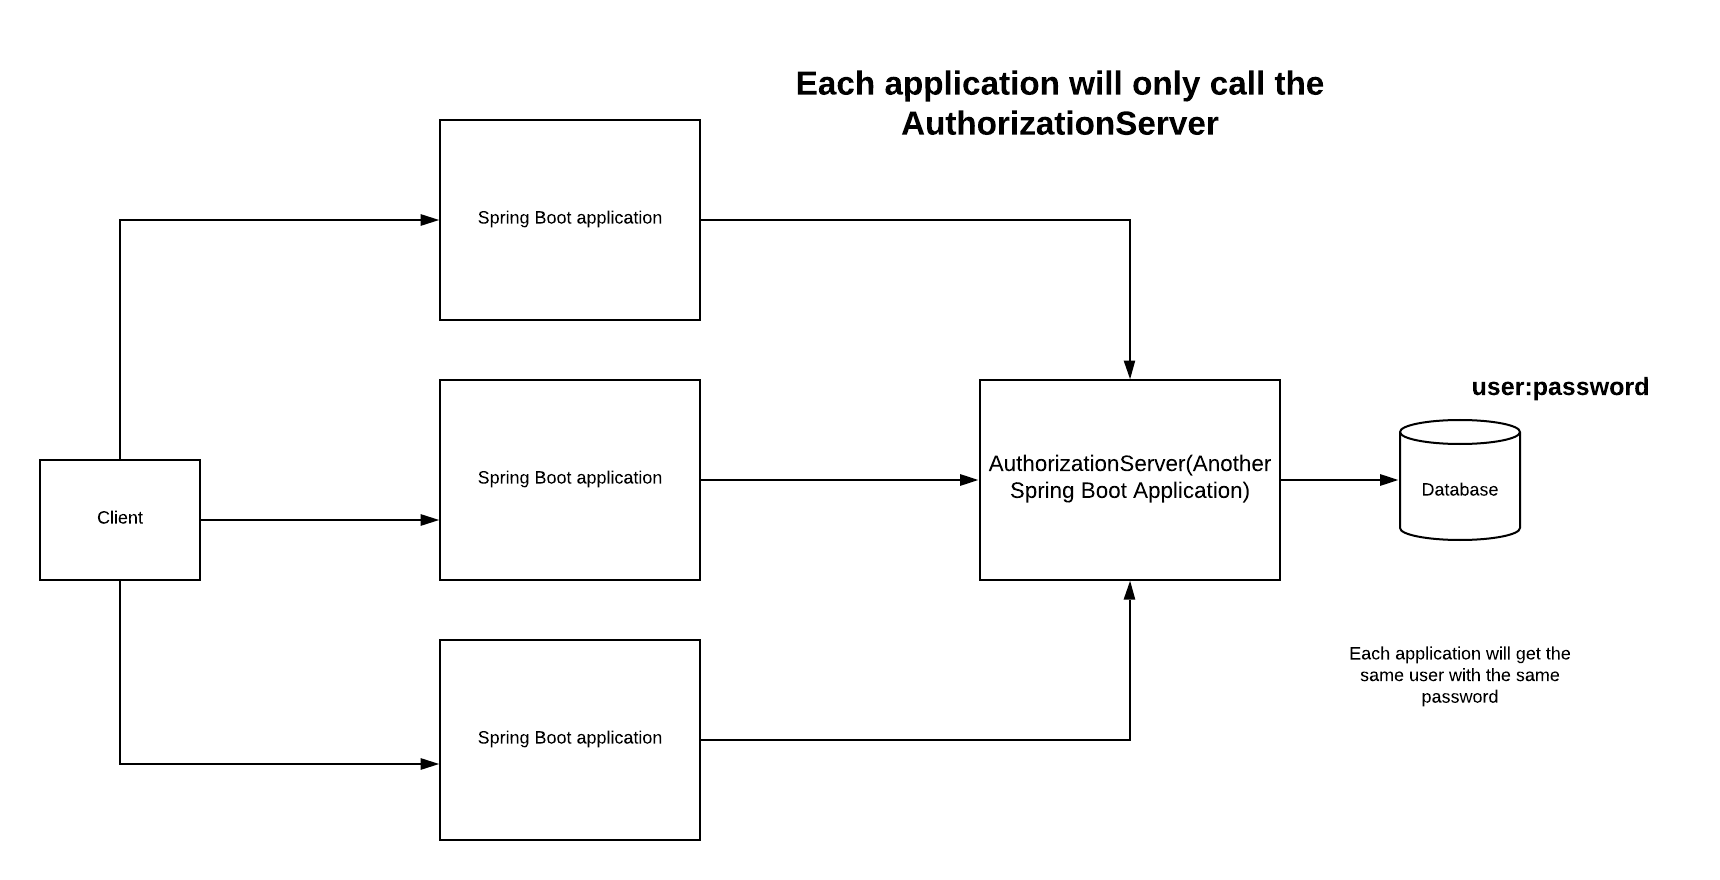
It is essential to know components of OAuth2 before diving into implementation.
This all processes can be easily understood by a picture:
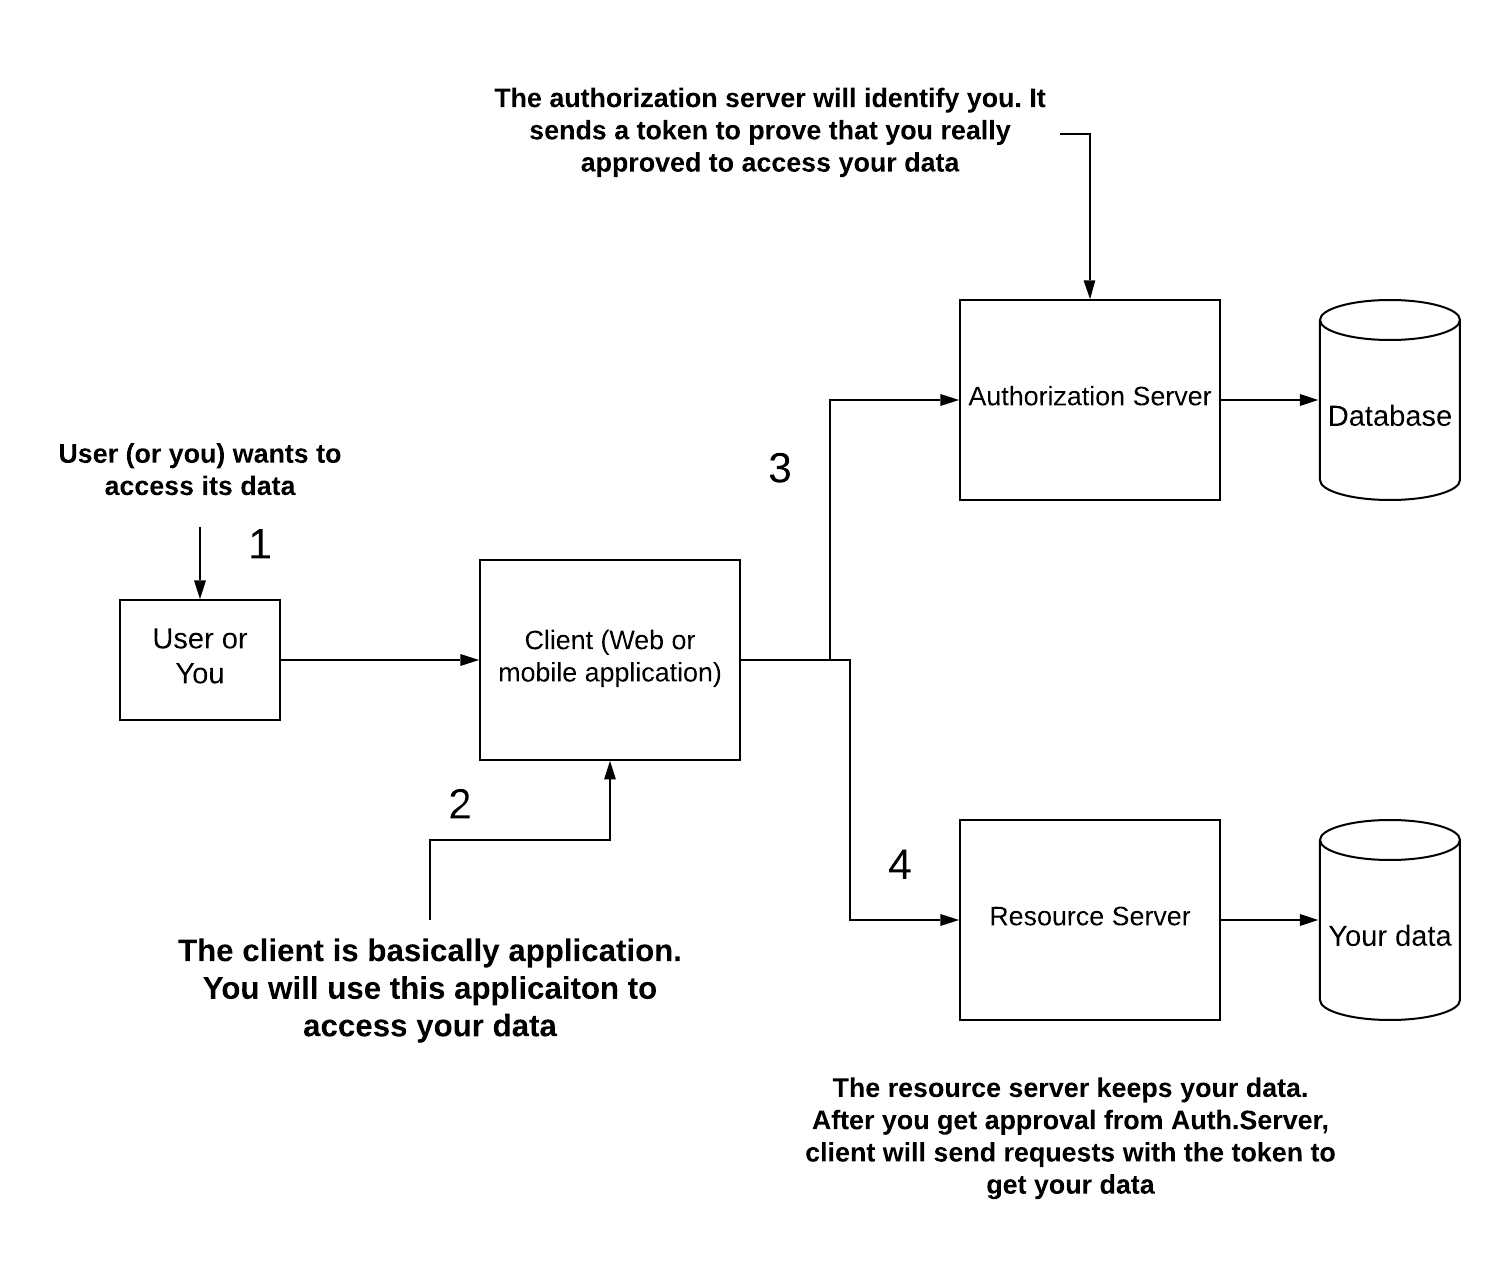
OAuth2 provides multiple possible authentication flows and we can choose the one which applies to our case. In general OAuth2 will provide us a token for authorization. Once we obtain the token, we can access specific resources. Multiple possible authentication provides multiple way to get token which is called grants.
Here are the most common grants OAuth2 provides:
Let’s discuss these by one by.
All process can be described in the flow graph:
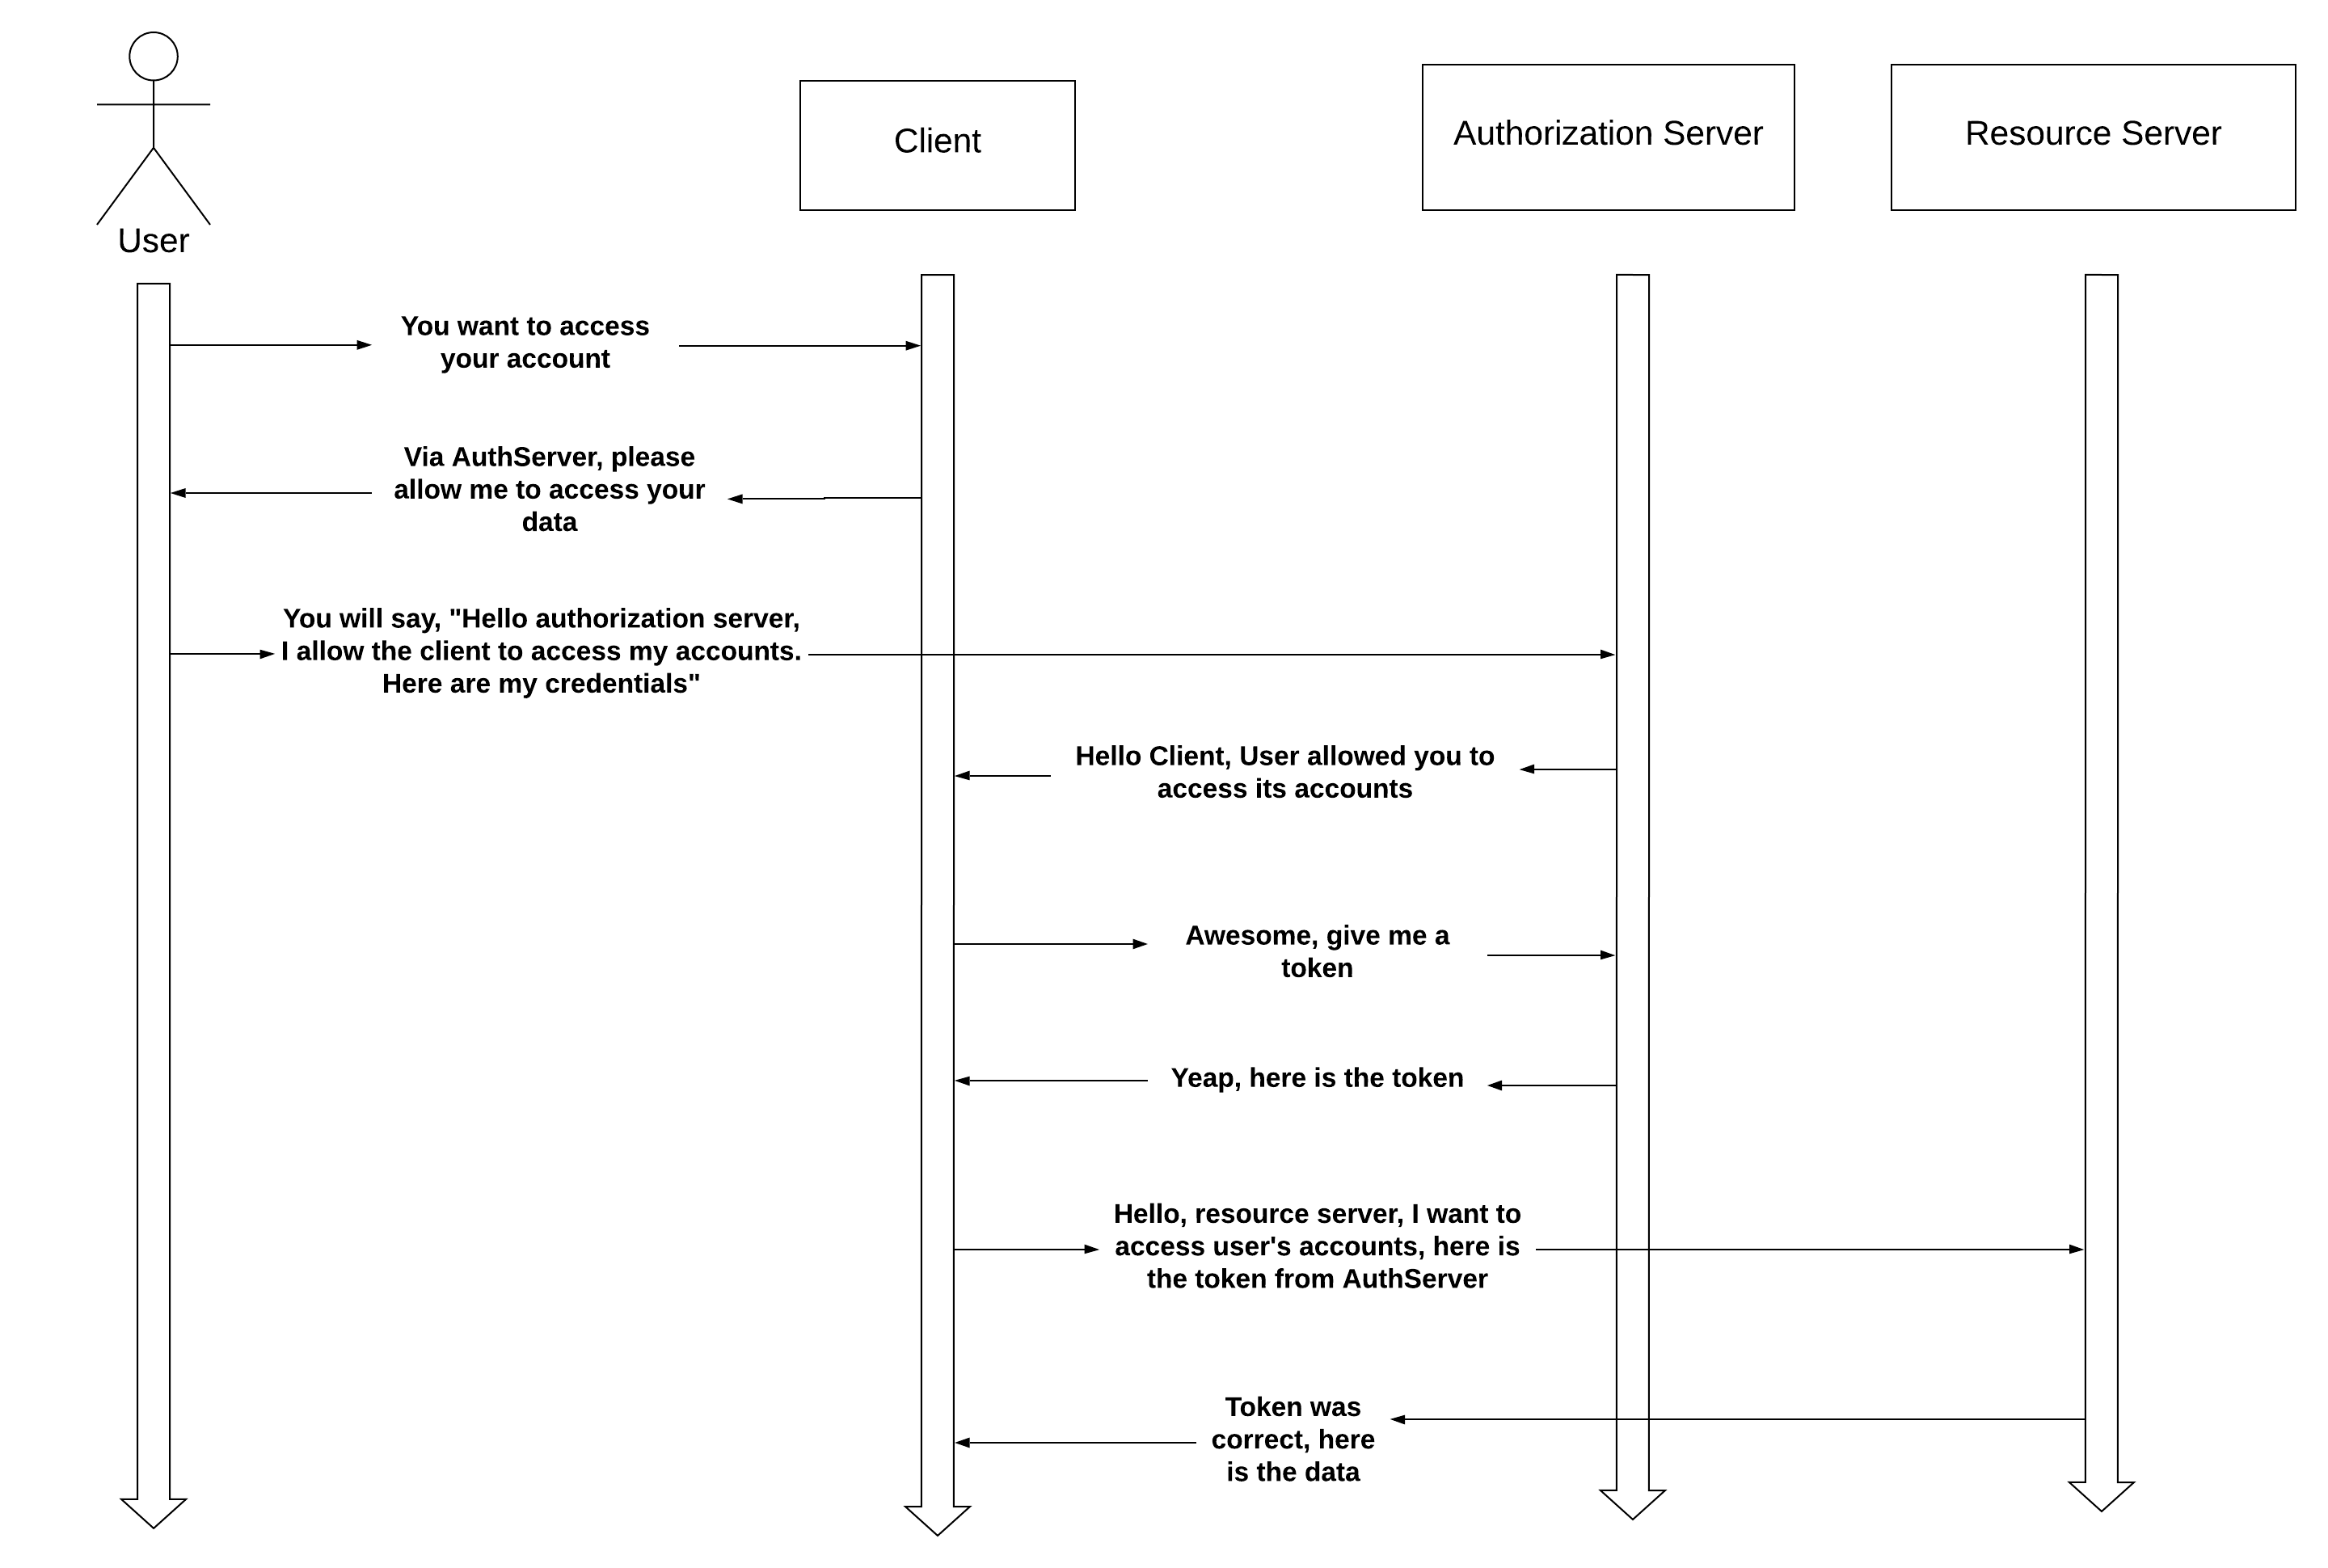
In detail, when client says “Via AuthServer, please allow me …” what it is happening is that client will redirect the user(you) to the authorization server login page.
When credentials, provided by you, was correct, authorization server will call the client’s url called redirect URI
Overall there are 3 steps:
The client redirects the user to an endpoint of the authorization server. For instance, this is happening when you click “Sign In with Google” on any websites
Be aware of that users will interact directly with the authorization server. Users won’t send the credentials to the client.(web or mobile app)
Client calls the authorization endpoint with the following details in the request:
response_type=code: indicates that client expects a code. The code will be used to obtain an access token.client_id=ID : This ID identifies client application.redirect_uri: tells the authorization server where to redirect the user after successful authentication.scope: related to the granted authoritiesstate: defines a cross-site request forgery (CSRF) token used for the CSRF protection.After successful authentication:
Step 1 is a proof that the user authenticated.
After the step1, the client will call the AuthSever with the code(first token) to get the token(second token).
Let’s be clear:
You may ask “why AuthServer didn’t return the token(access token) from the step 1? If AuthServer was return the token for the first time, the client wouldn’t need to call the second time”:
Actually there is flow called implicit grant type where AuthServer returns the access token with the first call. But nowadays, almost all known authServers doesn’t allow us to use implicit grant type because it has security problem:
To get an access token, client makes a call and sends:
Overall, in the step 2, client makes a request to the AuthServer. And the request contains:
code: it is the Authorization code from the step 1. (It is a prove that the user authenticated)client_id and client_secret **, these are the client’s credentialsredirect_url: same as the step 1grant_type: this is the value of authorization_code. Defines the flow we want to follow.As a response, the server sends back an access_token. The client will use this token to call resource server.
Right now, the client can call for the protected resource. The client uses an access token in the authorization request header when calling an endpoint of the resource server.
Now let’s discuss password grant type.
This grant_type is less secure than the authorization code grant type. Because user will share his/her credentials with the client.
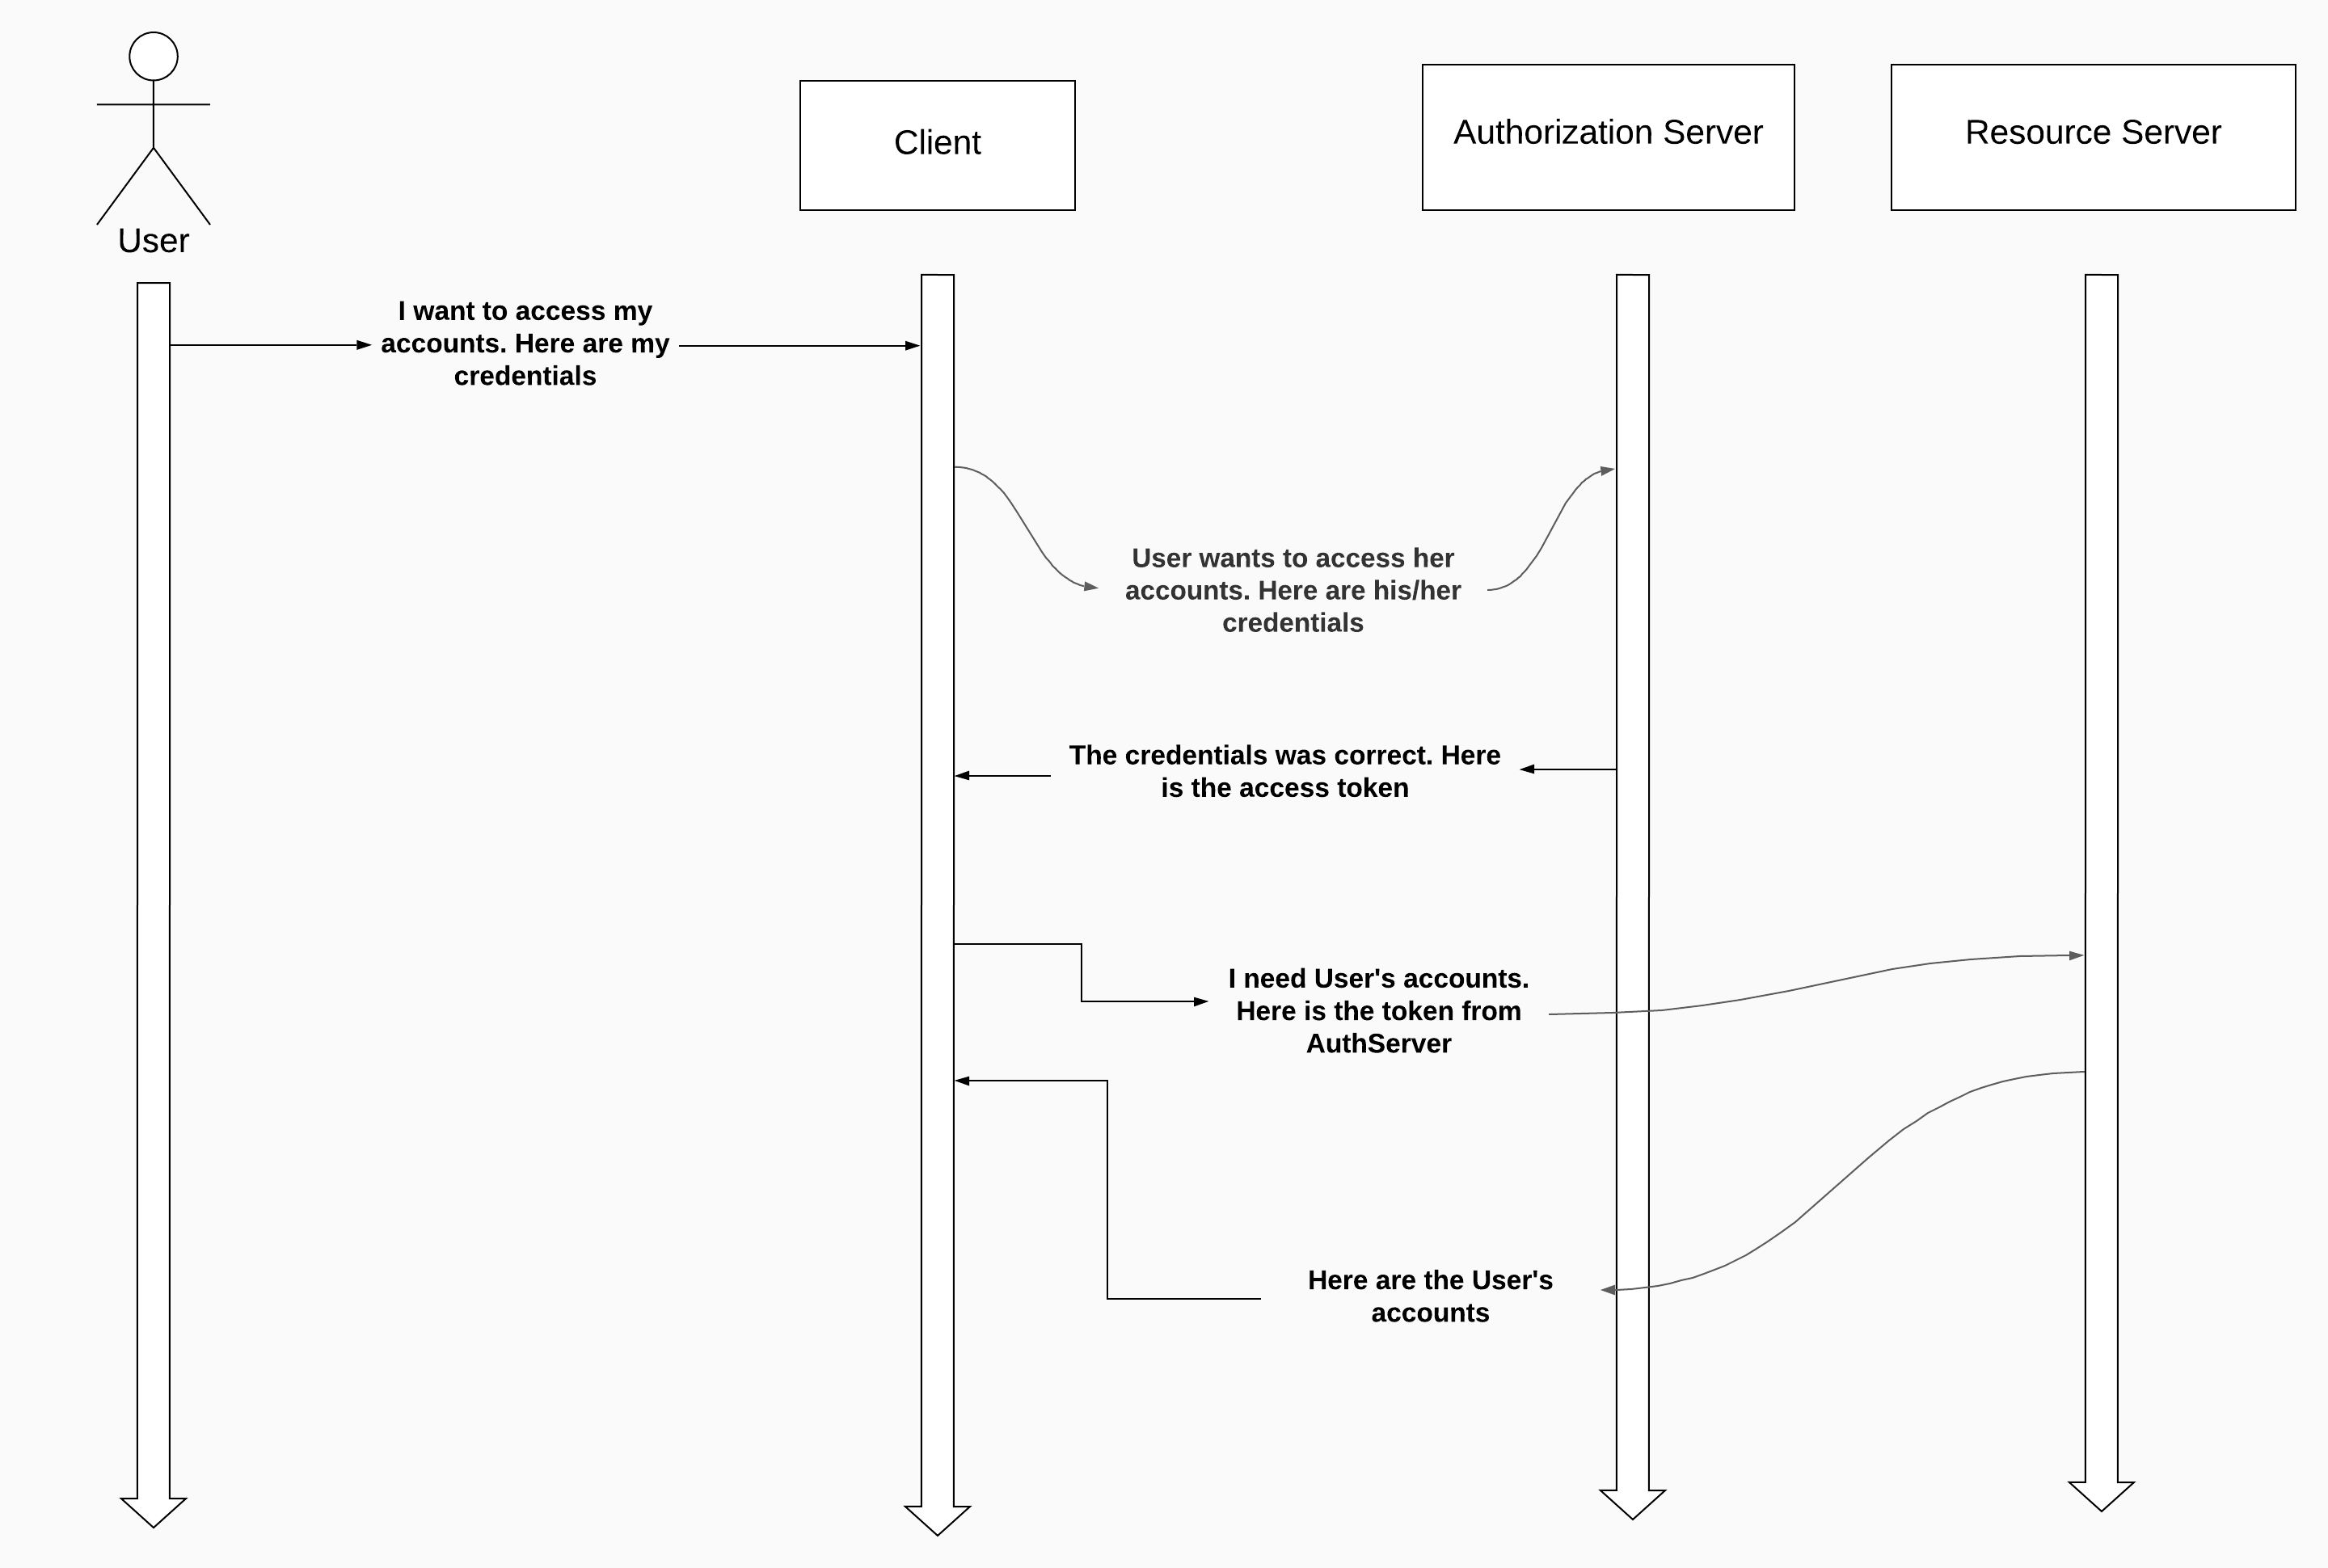
In this flow, the client collects the user credentials and uses these to authenticate and obtain an access token from the AuthServer
This flow generally is used when the authServer is maintained by the same organization. In the same organization, if we use Authorization code grant type, then for each logged-in requests users will be re-directed to the login page of the organization and back again. Password grant type can be a good choice for these scenarios.
There are two tasks to perform:
It is simple. The client collects the user credentials and calls the authorization server to obtain an access token. The client also sends the following :
grant_type: this is the value of password grant typeclient_id and client_secret: these are the client’s credentialsscope: related to the granted authoritiesusername and password: these are the user’s credentials. (sent as plain text)As a response, client receives an access token.
Once the client has an access token, it can use the token to call the endpoints on the resource server.
Let’s discuss client credentials grant type
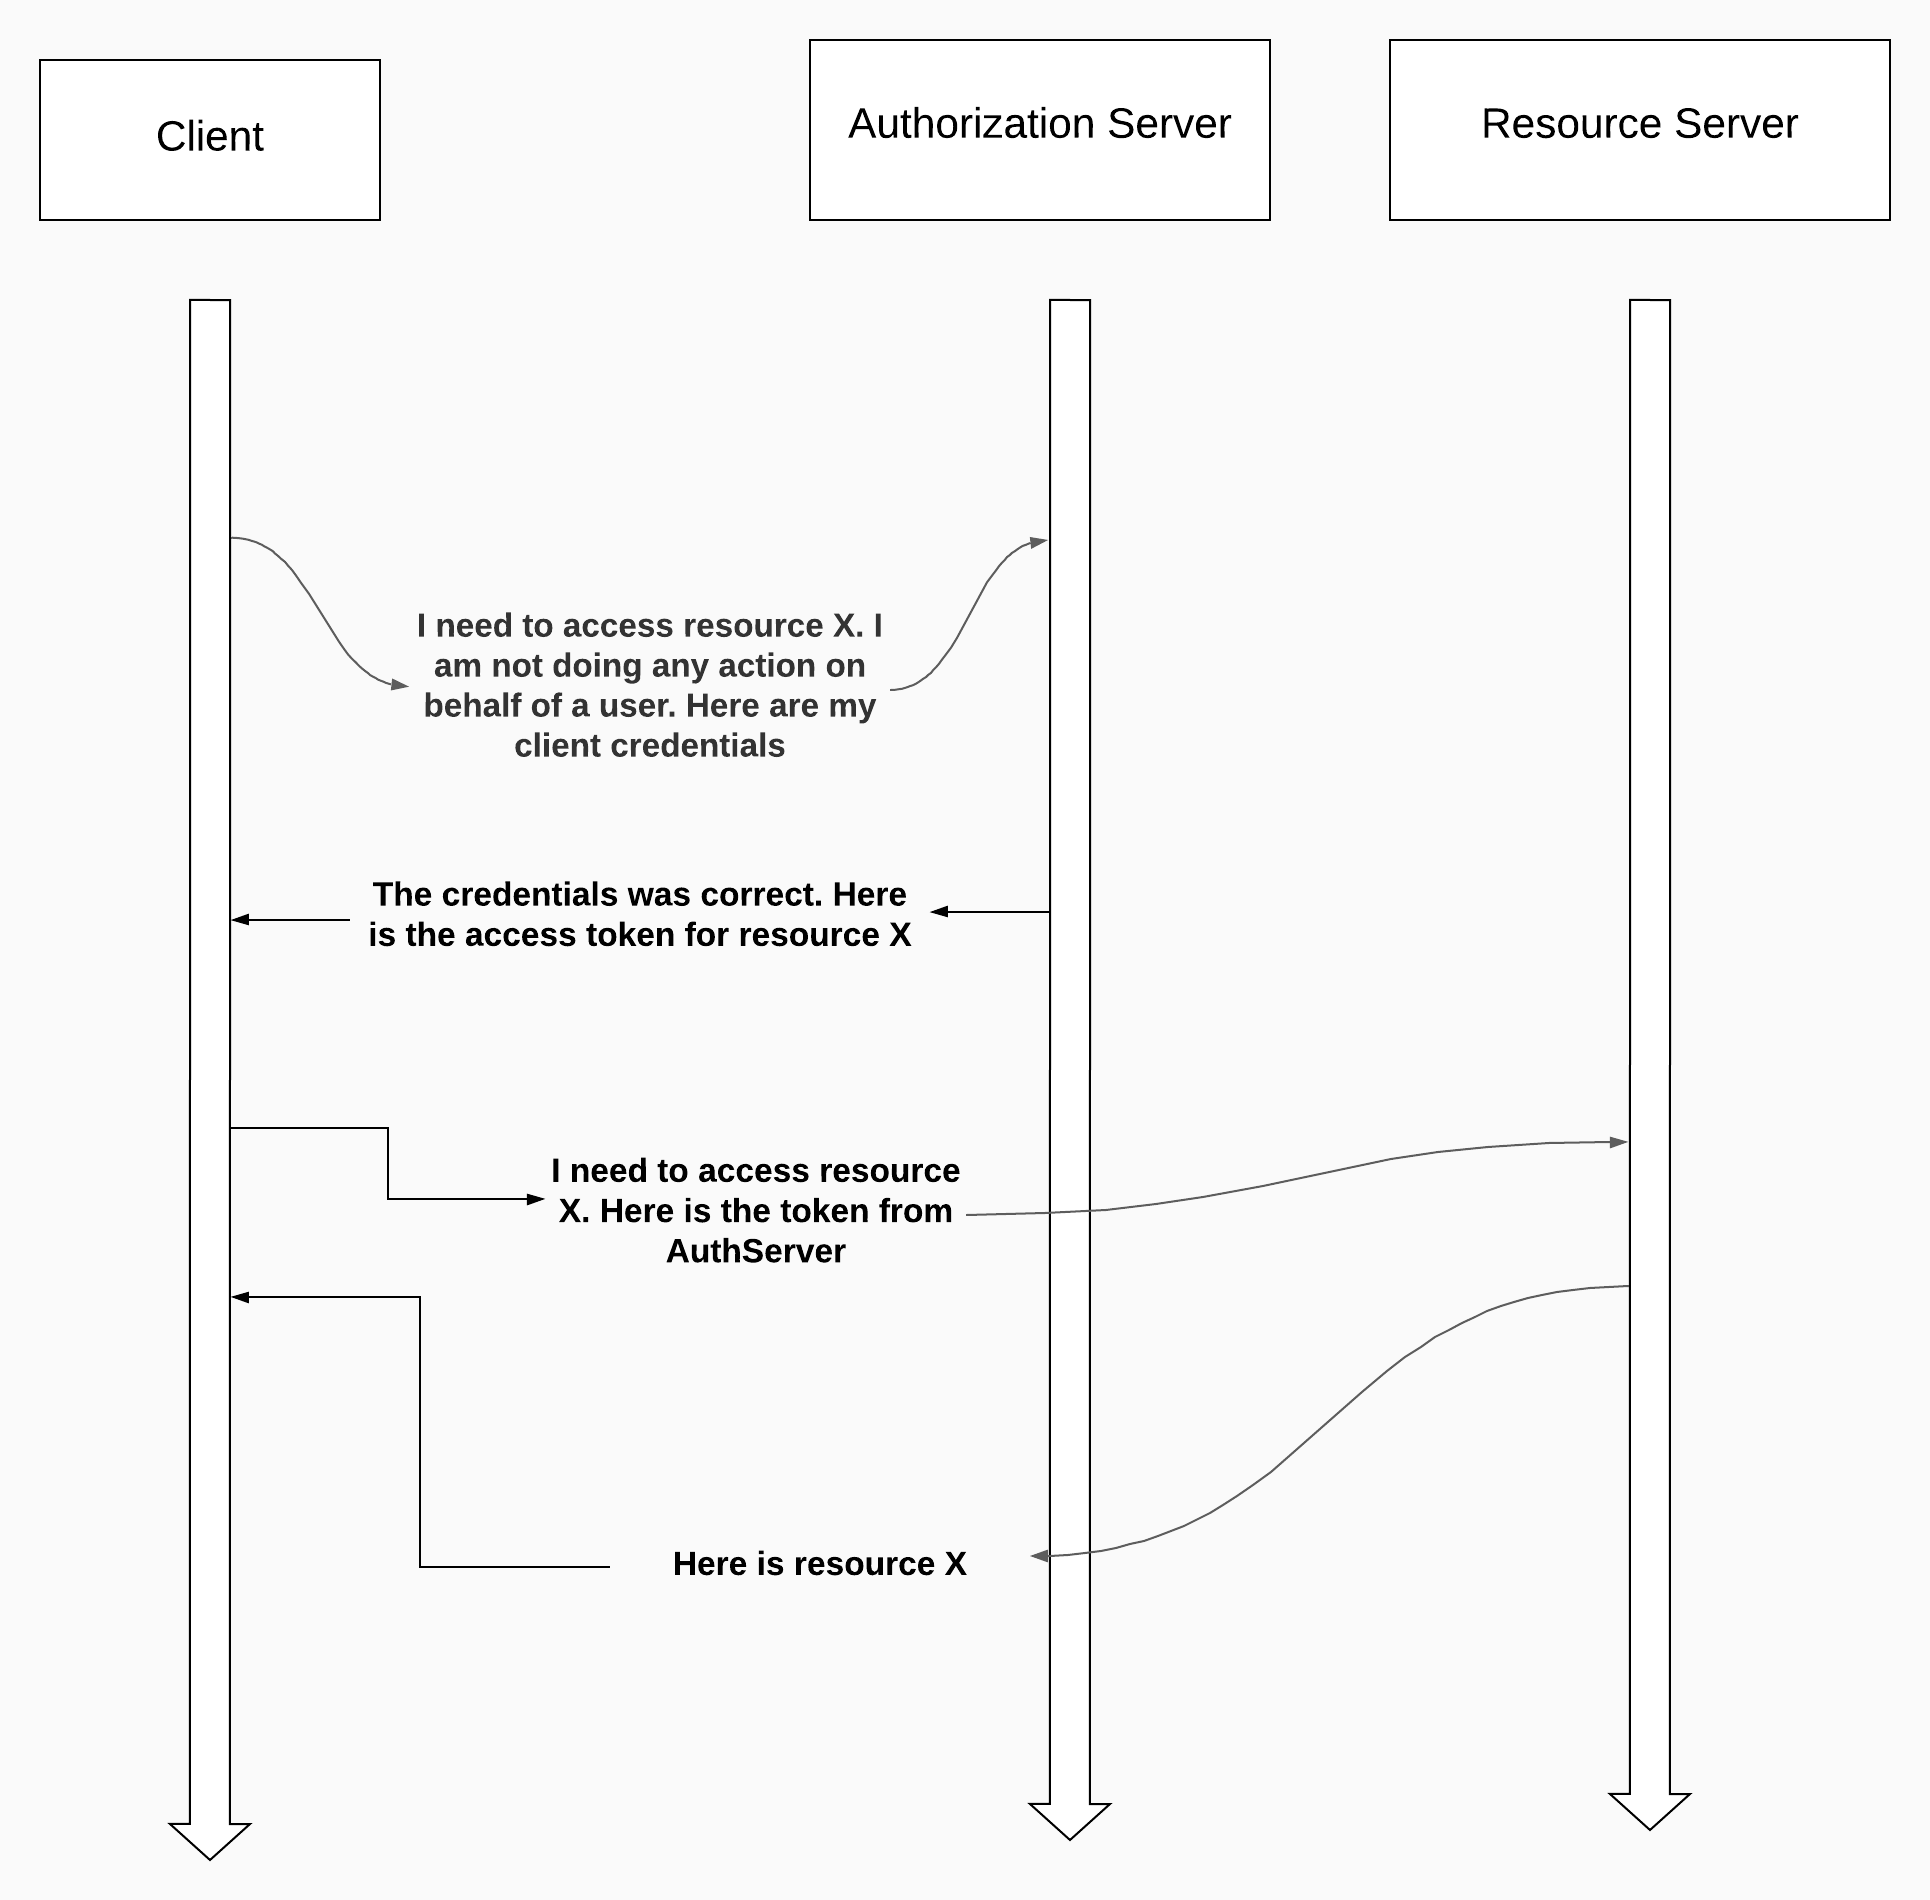
As you can see there is no actor like user in the flow.
This flow can be useful when only machine-to-machine communication is required. There are two steps:
Client will send a request with the following ones:
grant_type: this is the value of client credentials grant typeclient_id and client_secret: these are the client’s credentialsscope: related to the granted authoritiesIn response, client receives an access token.
The client will use the token to call endpoints on the resource server.
As a final step, let’s discuss the token itself.
Be aware of that, OAuth2 doesn’t force us to implement specific token. Even token can have an infinite expiry time. But as general, tokens generated from AuthServer has short live (as possible).
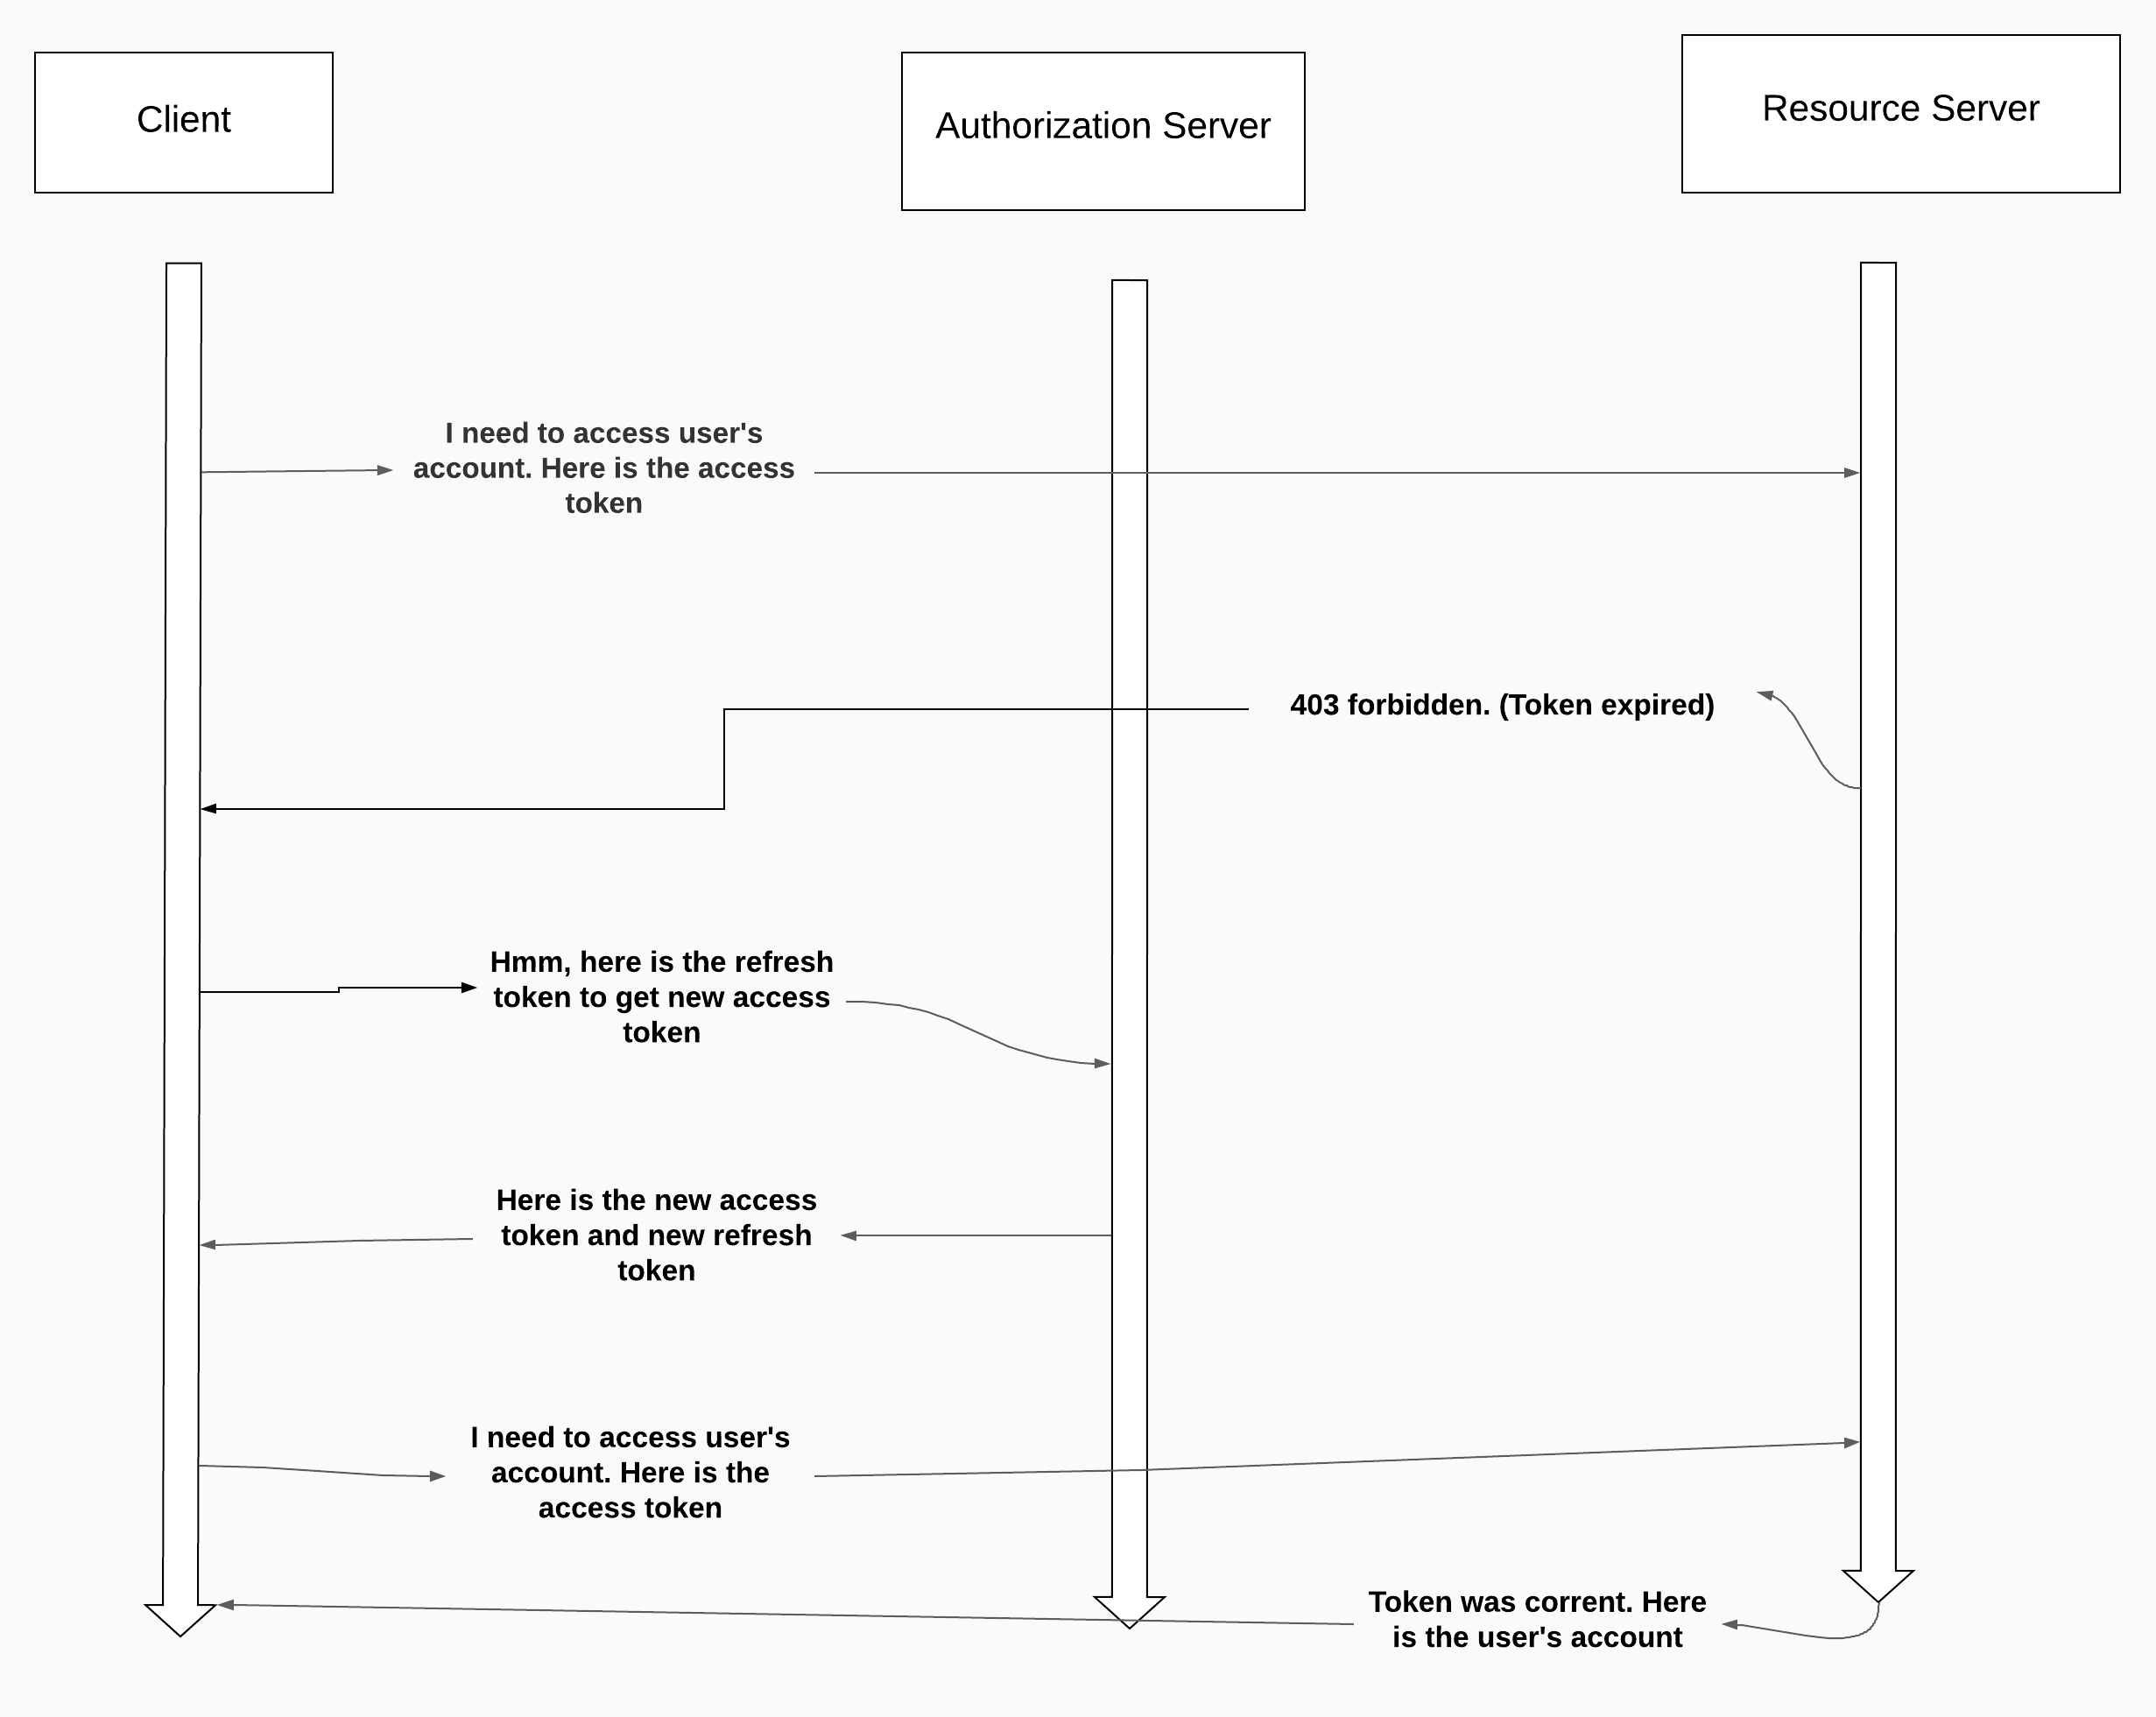
When the client has a refresh token, the client sends a request with the following:
grant_type: this is the value of refresh tokenclient_id and client_secret: these are the client’s credentialsrefresh_token: this is the refresh tokenscope: related to the granted authoritiesIn response, the authorization server returns a new access token and a new refresh token.
Of course, OAuth2 is not bulletproof solution. There can be some security problem while using OAuth2:
In this article, we looked at the what is the OAuth2 and theory of the OAuth2 itself.
We looked at the different implementations of OAuth2:
We also looked at the refresh token and its purpose. Basically refresh token is used when the access token is expired and it is useful because we don’t want to redirect users to login page every time when token is expired.
We also know that OAuth2 doesn’t force us to implement specific token. Even token can have an infinite expiry time.
As every software, OAuth2 has also some security issues when it is not implemented in the right way. Some security concerns:
In the next article, I will do an OAuth2 example with Spring Boot.

In this post, we are going to setup spring boot rest project with using JWT. we will also integrate the our spring boot application with the frontend …

In this tutorial, we are going to find location of your clients using spring boot and IP2Location and also we will look at how to update IP2Location …