Implementation of Outbox Pattern in Spring Boot
In distributed systems, we generally face the challenge of keeping our databases and external systems in sync. For instance when we create an order we …

Recently, I needed to create map on my project and to do that I had to learn Leaflet.
After adding to the leaflet to my project, I think it is good to write what I know about leaflet.
In this one article, we will learn what is the Leaflet and how to use it.
Leaflet is the leading open-source JavaScript library for mobile-friendly interactive maps. Weighing just about 39 KB of JS, it has all the mapping features most developers ever need.
We need leaflet css and js file before doing anything. And make sure you put the js file after css file in the index.html:
<!DOCTYPE html>
<html lang="en">
  <head>
    <meta charset="UTF-8" />
    <meta name="viewport" content="width=device-width, initial-scale=1.0" />
    <link
      rel="stylesheet"
      href="https://unpkg.com/[email protected]/dist/leaflet.css"
      integrity="sha512-xodZBNTC5n17Xt2atTPuE1HxjVMSvLVW9ocqUKLsCC5CXdbqCmblAshOMAS6/keqq/sMZMZ19scR4PsZChSR7A=="
      crossorigin=""
    />
    <!-- Make sure you put this AFTER Leaflet's CSS -->
    <script
      src="https://unpkg.com/[email protected]/dist/leaflet.js"
      integrity="sha512-XQoYMqMTK8LvdxXYG3nZ448hOEQiglfqkJs1NOQV44cWnUrBc8PkAOcXy20w0vlaXaVUearIOBhiXZ5V3ynxwA=="
      crossorigin=""
    ></script>
    <title>Document</title>
  </head>
  <body></body>
</html>
Then create a div with id :
Make sure the map container has a defined height
<!DOCTYPE html>
<html lang="en">
  <head>
    ...
    <style>
      #myMap {
        width: 100%;
        height: 100vh;
      }
    </style>
  </head>
  <body>
    <div id="myMap"></div>
  </body>
</html>
After we should create a map variable with the id of the div and set the location with the zoom level. Create new file leaflet_example.js and import it to the html page:
<!DOCTYPE html>
<html lang="en">
  <head>
    ...
  </head>
  <body>
    ...
  </body>
  <script src="./leaflet_example.js"></script>
</html>
Here is the JavaScript file:
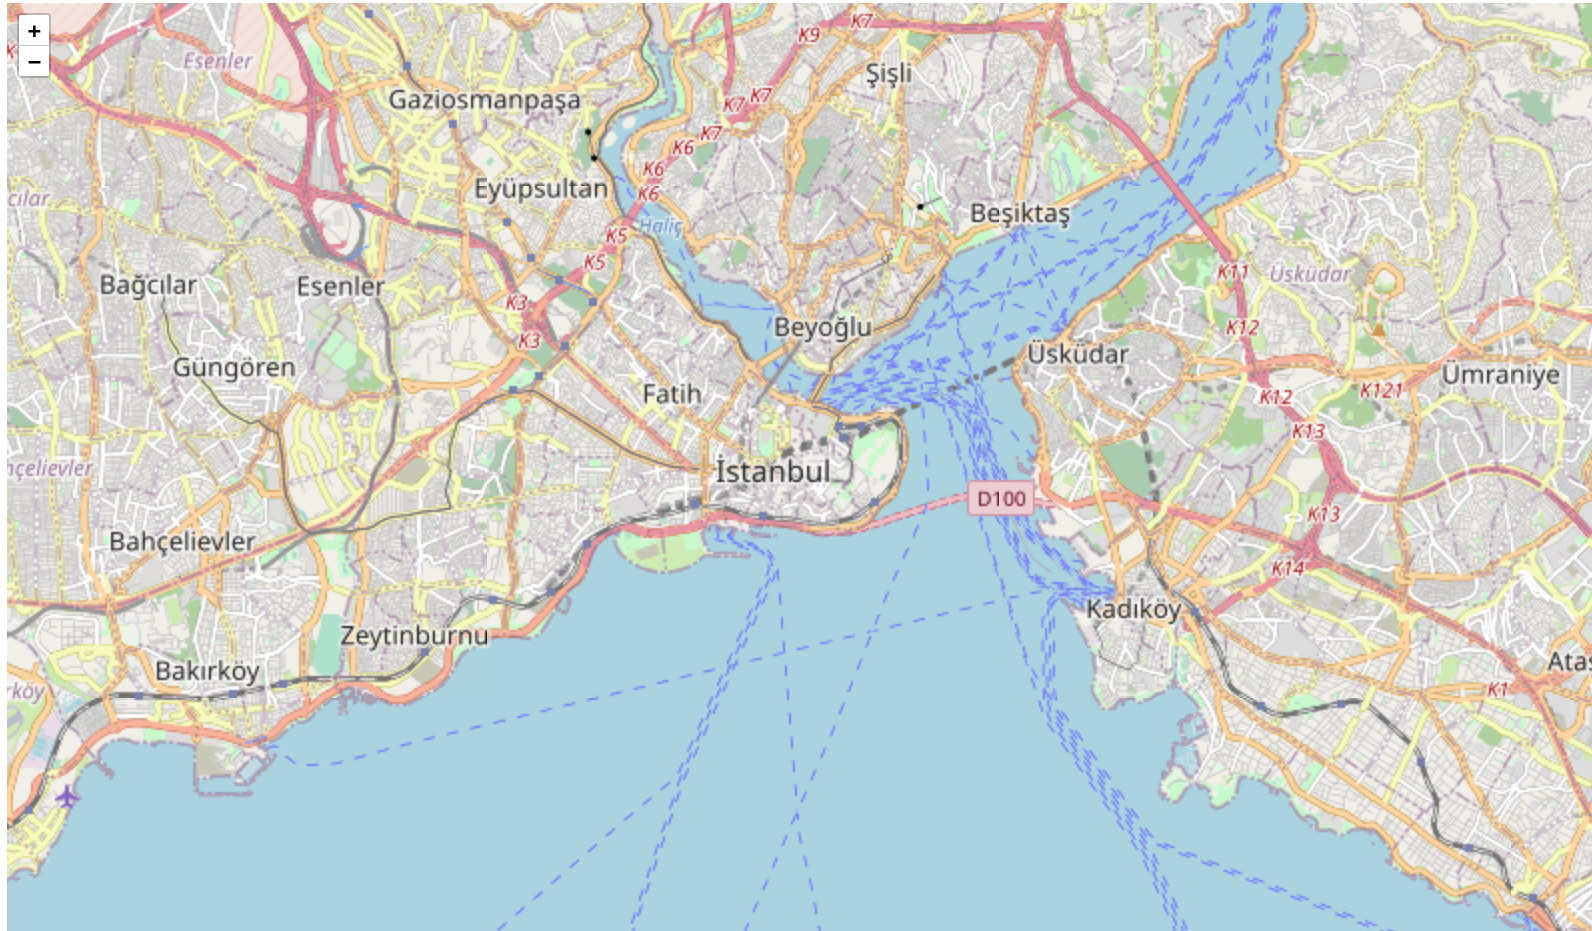
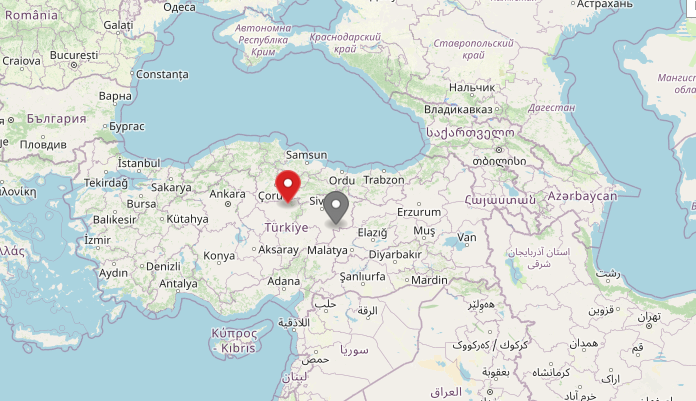
// 41.0082, 28.9784 = Istanbul/Turkey
var mymap = L.map("myMap").setView([41.0082, 28.9784], 13);
map(..) and setView(...) both return the map object. Therefore we can use like method chaining.Next, we should add tile layer to our map, in this tutorial, I will use free openstreetmap tile layer, but you can also use paid versions:
// 41.0082, 28.9784 = Istanbul/Turkey
// map initialization
var mymap = L.map("myMap").setView([41.0082, 28.9784], 13);
// adding the layer
var openStreetMap = L.tileLayer(
"http://{s}.tile.openstreetmap.org/{z}/{x}/{y}.png",
{
attribution:
'© <a href="https://openstreetmap.org/copyright">OpenStreetMap contributors</a>',
maxZoom: 18,
}
);
openStreetMap.addTo(mymap);
If you open the index.html file, you will see:
Before adding anything it is good to know basic objects in the leaflet.
LatLng is the javascript object to represent a geographical point with a certain latitude and longitude: (also accepts array creation and object creation style)
| Factory | Description |
|---|---|
L.latLng(<Number> latitude, <Number> *longitude*, <Number> *altitude?*) |
Creates an object representing a geographical point with the given latitude and longitude (and optionally altitude). |
L.latLng(<Array> coords) |
Expects an array of the form [Number, Number] or [Number, Number, Number] instead. |
L.latLng(<Object> coords) |
Expects an plain object of the form {lat: Number, lng: Number} or {lat: Number, lng: Number, alt: Number} instead. |
var latlng = L.latLng(50.5, 30.5);
var latlng = [50.5, 30.5];
You will mostly deal with markers, therefore it is good to know some of options you have.
| Option | Type | Default | Description |
|---|---|---|---|
icon |
Icon |
L.Icon.Default |
Icon instance to use for rendering the marker. See Icon documentation for details on how to customize the marker icon. If not specified, a common instance of L.Icon.Default is used. |
keyboard |
Boolean |
true |
Whether the marker can be tabbed to with a keyboard and clicked by pressing enter. |
title |
String |
'' |
Text for the browser tooltip that appear on marker hover (no tooltip by default). |
**alt** |
String |
'' |
Text for the alt attribute of the icon image (useful for accessibility). |
**zIndexOffset** |
Number |
0 |
By default, marker images zIndex is set automatically based on its latitude. Use this option if you want to put the marker on top of all others (or below), specifying a high value like 1000 (or high negative value, respectively). |
**opacity** |
Number |
1.0 |
The opacity of the marker. |
**riseOnHover** |
Boolean |
false |
If true, the marker will get on top of others when you hover the mouse over it. |
**riseOffset** |
Number |
250 |
The z-index offset used for the riseOnHover feature. |
**pane** |
String |
'markerPane' |
Map pane where the markers icon will be added. |
**shadowPane** |
String |
'shadowPane' |
Map pane where the markers shadow will be added. |
**bubblingMouseEvents** |
Boolean |
false |
When true, a mouse event on this marker will trigger the same event on the map (unless L.DomEvent.stopPropagation is used). |
Besides tile layers, we can also add other things such as markers, polylines, polygons popups more.
L.Marker is used to display clickable/draggable icons on the map.
L.marker(<LatLng> latlng, <Marker options> options?)
var marker = L.marker([51.5, -0.09]).addTo(mymap);
Let’s add marker to our map:
// 41.0082, 28.9784 = Istanbul/Turkey
var mymap = L.map("myMap").setView([41.0082, 28.9784], 13);
var openStreetMap = L.tileLayer(...);
openStreetMap.addTo(mymap);
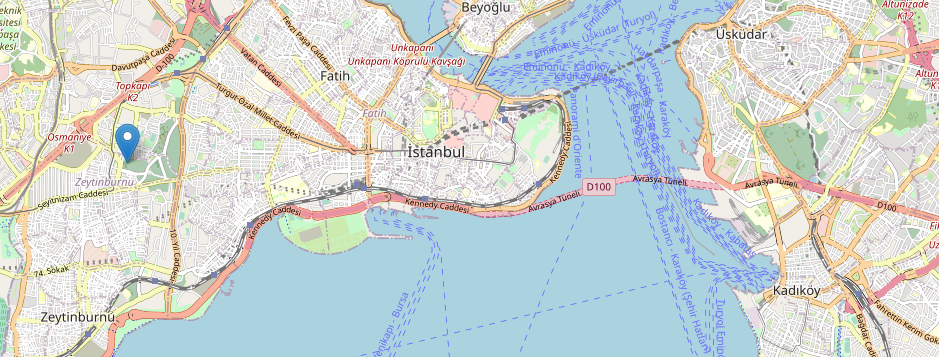
var marker = L.marker([41.0079, 28.9121]);
marker.addTo(mymap);
Open the html page:
If you click the marker, nothing will happen. We can add popup to the marker.
// ...
var marker = L.marker([41.0079, 28.9121]);
marker.bindPopup("Popup content");
marker.addTo(mymap);
Now click the marker:

We can also add our customize icon instead of the default one. For instance I downloaded the twitter icon and add it to the marker.
For more information about leaflet icon, please refer to the https://leafletjs.com/reference-1.7.1.html#icon
// ...
var twitterIcon = L.icon({
  iconUrl: "../assets/twitter.png",
  iconSize: [38, 38],
  iconAnchor: [22, 94],
  popupAnchor: [-3, -76],
});
var marker = L.marker([41.0079, 28.9121], { icon: twitterIcon });
Here is the icon in the html page:
Leaflet provides a method (toGeoJSON()) to convert GeoJSON format.
var marker = L.marker([41.0079, 28.9121]);
marker.bindPopup("Popup content");
marker.addTo(mymap);
// convert to the geoJson format
console.log(marker.toGeoJSON());
Popups are usually used when we want to attach some information to a particular object on a map. We can add popup to marker, circle and polygon:
marker.bindPopup("<b>Hello world!</b><br>I am a popup.").openPopup();
circle.bindPopup("I am a circle.");
polygon.bindPopup("I am a polygon.");
openPopup is only used for markers, this method opens the popup immediately
Here is the creation method:
var popup = L.popup(<Popup options> options?, <Layer> source?)
We can also add popup as layers:
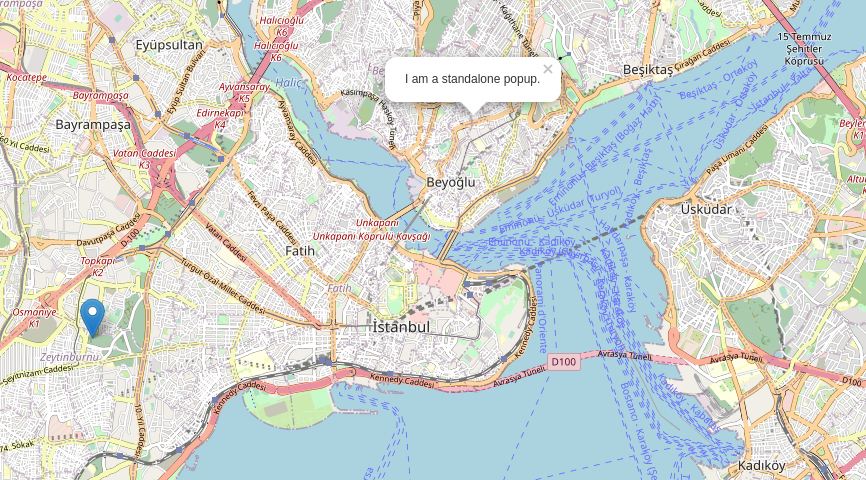
var popup = L.popup()
  .setLatLng([41.0369, 28.9775])
  .setContent("I am a standalone popup.")
  .openOn(mymap);
If we have bunch of markers we can group them as one variable. For instance:
var city1 = L.marker([41.0153, 28.7315]).bindPopup("This is Avcılar/İstanbul"),
  city2 = L.marker([41.0079, 28.9121]).bindPopup("This is Beyoğlu/İstanbul."),
  city3 = L.marker([40.9819, 29.0576]).bindPopup("This is Kadıköy/İstanbul.");

var cities = L.layerGroup([city1, city2, city3]);
If we have bunch of tiles providers, we can also control them.
First let’s add a few providers: (You can find the available providers in the address => https://leaflet-extras.github.io/leaflet-providers/preview/)
I will add OpenTopoMap and Stadia.AlidadeSmooth layer.
var openStreetMap = L.tileLayer(
"http://{s}.tile.openstreetmap.org/{z}/{x}/{y}.png",
{
attribution: "CustomDefinition",
maxZoom: 18,
}
);
var OpenTopoMapLayer = L.tileLayer(
"https://{s}.tile.opentopomap.org/{z}/{x}/{y}.png",
{
maxZoom: 17,
attribution:
'Map data: © <a href="https://www.openstreetmap.org/copyright">OpenStreetMap</a> contributors, <a href="http://viewfinderpanoramas.org">SRTM</a> | Map style: © <a href="https://opentopomap.org">OpenTopoMap</a> (<a href="https://creativecommons.org/licenses/by-sa/3.0/">CC-BY-SA</a>)',
}
);
var Stadia_AlidadeSmoothLayer = L.tileLayer(
"https://tiles.stadiamaps.com/tiles/alidade_smooth/{z}/{x}/{y}{r}.png",
{
maxZoom: 20,
attribution:
'© <a href="https://stadiamaps.com/">Stadia Maps</a>, © <a href="https://openmaptiles.org/">OpenMapTiles</a> © <a href="http://openstreetmap.org">OpenStreetMap</a> contributors',
}
);
Group the layers into one object:
var allLayers = {
  OpenStreetMap_Default: openStreetMap,
  OpenTopoMapLayer: OpenTopoMapLayer,
  Stadia_AlidadeSmoothLayer: Stadia_AlidadeSmoothLayer,
};
Final step is to add the all layers:
var openStreetMap = L.tileLayer(..);

var OpenTopoMapLayer = L.tileLayer(...);

var Stadia_AlidadeSmoothLayer = L.tileLayer(...);

var allLayers = {
  OpenStreetMap_Default: openStreetMap,
  OpenTopoMapLayer: OpenTopoMapLayer,
  Stadia_AlidadeSmoothLayer: Stadia_AlidadeSmoothLayer,
};
// don't forget to add default map
openStreetMap.addTo(mymap);
// add all layers
L.control.layers(allLayers).addTo(mymap);
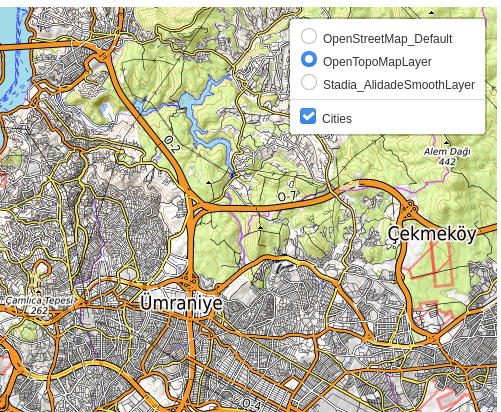
After open the html page, please look at the upper-left corner:
Right now we can switch between available layers (hover over the icon)
We can also add markers to the all available layers automatically. Also we can show or disable all the markers with only one click.
First combine all groups into one object:
var city1 = L.marker([41.0153, 28.7315]).bindPopup("This is Avcılar/İstanbul"),
  city2 = L.marker([41.0079, 28.9121]).bindPopup("This is Beyoğlu/İstanbul."),
  city3 = L.marker([40.9819, 29.0576]).bindPopup("This is Kadıköy/İstanbul.");
var cities = L.layerGroup([city1, city2, city3]);

var overlayMaps = {
  Cities: cities,
};
Then pass this object to the L.control.layer() method:
var overlayMaps = {
  Cities: cities,
};

L.control.layers(allLayers, overlayMaps).addTo(mymap);
Hover the upper-left icon and try it.
If we want to see all available layer without hovering the icon, we can add the options collapsed:false
L.control.layers(allLayers, overlayMaps, { collapsed: false }).addTo(mymap);
For more information => https://leafletjs.com/reference-1.7.1.html#map-methods-for-layers-and-controls
Before diving into how to use GeoJSON with the leaflet, I should first talk about what the GeoJSON is
Simply, it is the open standart format to represent locational data in JSON format.
Here is the example:
{
  "type": "Feature",
  "geometry": {
    "type": "Point",
    "coordinates": [125.6, 10.1]
  },
  "properties": {
    "name": "Dinagat Islands"
  }
}
GeoJSON supports the following geometry types: Point, LineString, Polygon, MultiPoint, MultiLineString, and MultiPolygon.
Geometric objects with additional properties are Feature objects. Sets of features are contained by FeatureCollection objects.
GeoJSON is being used to:
Leaflet is fully compliant with GeoJSON format.
For more information just open the https://geojson.io
Just click to the draw a marker , after drawing the marker your GeoJSON format should be like this:
{
  "type": "FeatureCollection",
  "features": [
    {
      "type": "Feature",
      "properties": {},
      "geometry": {
        "type": "Point",
        "coordinates": [35.5078125, 39.90973623453719]
      }
    }
  ]
}
If we add more markers and/or change the marker color:
{
  "type": "FeatureCollection",
  "features": [
    {
      "type": "Feature",
      "properties": {
        "marker-color": "#d92323",
        "marker-size": "medium",
        "marker-symbol": ""
      },
      "geometry": {
        "type": "Point",
        "coordinates": [35.5078125, 39.90973623453719]
      }
    },
    {
      "type": "Feature",
      "properties": {},
      "geometry": {
        "type": "Point",
        "coordinates": [37.6171875, 39.198205348894795]
      }
    }
  ]
}
This JSON format will be interpreted by the OpenStreetMap like this:
I just created simple json file. Let’s use this json file inside the leaflet.
{
  "type": "FeatureCollection",
  "features": [
    {
      "type": "Feature",
      "properties": {
        "marker-color": "#e11313",
        "marker-size": "medium",
        "marker-symbol": "",
        "customProp": "myValue"
      },
      "geometry": {
        "type": "Point",
        "coordinates": [28.946828842163082, 41.007754892144106]
      }
    },
    {
      "type": "Feature",
      "properties": {
        "marker-color": "#16ecd2",
        "marker-size": "medium",
        "marker-symbol": ""
      },
      "geometry": {
        "type": "Point",
        "coordinates": [28.971118927001953, 41.00930934470789]
      }
    },
    {
      "type": "Feature",
      "properties": {},
      "geometry": {
        "type": "Point",
        "coordinates": [28.96073341369629, 41.01837625377283]
      }
    },
    {
      "type": "Feature",
      "properties": {},
      "geometry": {
        "type": "Point",
        "coordinates": [28.946399688720703, 41.01656297179023]
      }
    }
  ]
}
Only action we should do is to represent the json file as javascript variable pass it to the L.geoJSON() method:
var markers = {
  type: "FeatureCollection",
  features: [
    {
      type: "Feature",
      properties: {
        "marker-color": "#e11313",
        "marker-size": "medium",
        "marker-symbol": "",
        customProp: "myValue",
      },
      geometry: {
        type: "Point",
        coordinates: [28.946828842163082, 41.007754892144106],
      },
    },
  ],
};

L.geoJSON(markers).addTo(mymap);
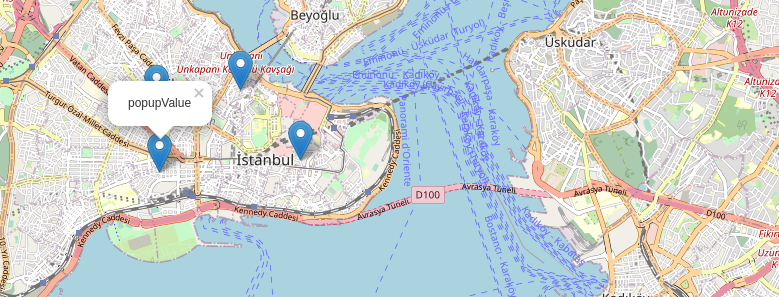
Let’s say we want to also pass the popup text value for each marker like this:
{
  "type": "Feature",
  "properties": {
    "marker-color": "#e11313",
    "marker-size": "medium",
    "marker-symbol": "",
    "popupValue": "popupValue"
  },
  "geometry": {
    "type": "Point",
    "coordinates": [28.946828842163082, 41.007754892144106]
  }
}
To use popupValue property we can use onEachFeature function which will be called once for each created feature:
L.geoJSON(markers, {
  onEachFeature: function (feature, layer) {
    layer.bindPopup(feature.properties.popupValue);
  },
}).addTo(mymap);
Lastly let’s talk a little bit about events
We can also add events to our map.
Let’s add some events:
var mymap = L.map("myMap").setView([41.0082, 28.9784], 13);
// ...
mymap.on("mouseover", function () {
  console.log("mouse over event");
});
All events can be found => https://leafletjs.com/reference-1.7.1.html#map-event
In distributed systems, we generally face the challenge of keeping our databases and external systems in sync. For instance when we create an order we …
Sometimes you may need to create your sql queries on runtime with some specification given by your client. In these cases, you may create many JPQLs …