JavaFX Basic Inputs and Controls
If you are going to draw something on the screen and handle some mouse event, then you can only use MouseEvent listener and AnimationTimer …
In this blog post, let’s talk about laying out the components in the JavaFX. We need a pre-defined layout solution because computing the coordinates for each components will be really hard.
In JavaFX, Some components are called containers which hold other components(called children). The children of a container must be laid out means we need to set their sizes and positions. And this setting operation generally is done by the container. Because different containers implement different policies for laying out the child nodes.
The scene graph consists of a window (stage), scene and its nodes
Every scene graph has a minimum, maximum and preferred width and height.
Most components in JavaFX are resizable meaning to be resized by a container during layout. But some components are not resizable which means the minimum, maximum and preferred width and height will be equal to the component’s actual size. Canvas and ImageView are the examples for non-resizable components.
In JavaFX, components(or containers) that is responsible for layout are defined by the class Pane
If we want to define custom layout, then we can use Pane. However responsibility of setting the positions of child nodes must also defined by us when we are working with custom pane
For instance we can call the method for the node:
node.relocate(x, y)
whichs puts the node to the x,y point (top-left corner is the 0,0)
If our node is resizable then we can call:
node.resize(width, height)
However if our node isn’t resizable calling this method has no effect.
If the node is in a container and also that container does the all layout, then calling the relocate()or resize() won’t have any effect. (And we are assuming that node is managed by the container)
If the node is in a container such as Pane, then we can only call resize(). Calling relocate() won’t have any effect.(And we are assuming that node is managed by the container)
We can also remove node from the container (meaning that removing the management). When we do that, any container that contains node as a child will completely ignore node, as far as layout is concerned.
node.setManaged(false)
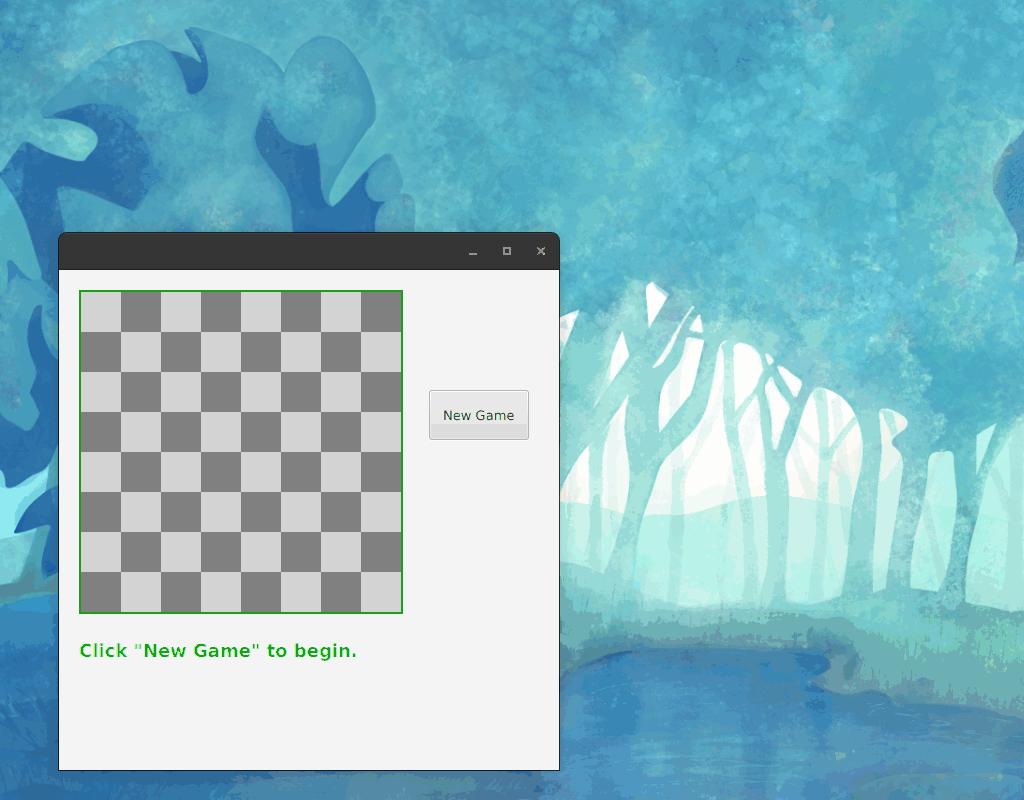
As a final step let’s draw an checkerboard with basic button to update label using Pane layout. Here is the final program:
I am not going into the details of how checkerboard will be drawn, you can look at the Checkerboardin the source code
public class Checkerboard extends Canvas {}
To update message (i mean label), we have to define the label outside of the start() method:
public class App extends Application {
    private Label message;
    private int clickCount;

    @Override
    public void start(Stage stage) {
        Checkerboard checkerboard = new Checkerboard();
        checkerboard.drawBoard();

        Button newGame = new Button("New Game");
        newGame.setOnAction(e -> updateMessage());

        message = new Label("Click \"New Game\" to begin.");
        message.setTextFill( Color.rgb(100,255,100) );
        message.setFont( Font.font(null, FontWeight.BOLD, 18) );

        // ...
    }

    public static void main(String[] args) {
        launch();
    }
After that we can update message in the label using updateMessage() method: (Each time user clicks the button updateMessage will be run)
private void updateMessage() {
    clickCount++;
    message.setText("Click count: " + clickCount + ":  \"New Game\" was clicked.");
}
Now because we will use Pane for the layout we have to define the location of the nodes (we have three nodes checkerboard, label and button):
public class App extends Application {
   t;

    @Override
    public void start(Stage stage) {
        // x,y coordinates
        checkerboard.relocate(20,20);
        newGame.relocate(370, 120);
        message.relocate(20, 370);
        // ...

    }
}
As you can see in the final application button’s size is also different, to make button’s size different we have to remove management responsibility from the Pane layout, otherwise Pane layout will determine the button’s size:
public class App extends Application {

    @Override
    public void start(Stage stage) {

        Button newGame = new Button("New Game");
        newGame.setOnAction(e -> updateMessage());

        // ...

        newGame.setManaged(false);
        newGame.resize(100,50);
    }
}
The last action is just to define Pane layout (with preferred sizes) adding the nodes and setting to the Scene:
public class App extends Application {

    @Override
    public void start(Stage stage) {
        // ...
        Pane root = new Pane();
        root.setPrefHeight(500);
        root.setPrefWidth(500);
        root.getChildren().addAll(checkerboard, newGame, message);

        Scene scene = new Scene(root);
        stage.setScene(scene);
        stage.show();
    }


    public static void main(String[] args) {
        launch();
    }
}
PaneI will continue with the BorderPane, HBox and VBox layouts …
If you are going to draw something on the screen and handle some mouse event, then you can only use MouseEvent listener and AnimationTimer …
In JavaFX, events are represented by objects. When an event occurs, system collects all the information relevant to the event and construct an object …